Skip to content
  • Shop
  • About
  • Portfolio
    • Quilt Patterns
    • Cross Stitch Patterns
    • Fabric Design
    • Surface Pattern Design
  • Learn
    • Classes
    • Lectures
    • On-Line Classes
    • Tips and Tutorials
    • Quilt Along
  • Blog
  • Contact
  • Shop
  • About
  • Portfolio
    • Quilt Patterns
    • Cross Stitch Patterns
    • Fabric Design
    • Surface Pattern Design
  • Kate Colleran Designs
  • Learn
    • Classes
    • Lectures
    • On-Line Classes
    • Tips and Tutorials
    • Quilt Along
  • Blog
  • Contact
Exploring Quilting Basics

ReImagine Projects – How to resize for your block!

October 15, 2025October 15, 2025 Post a comment

Hi friends!

Recently, Kris and I introduced a new series of patterns called the ReImagine projects series. These patterns are for your leftover blocks, those orphan blocks or abandoned project blocks that you don’t want to get rid of but don’t know what to with!

ReImagine Projects

The 4 ReImagine projects are a tote bag pattern, a pillow pattern, a table runner and a banner. We decided to create 4 projects that could use one block or multiple blocks. Each pattern is written for 6″, 8″, 10″, or 12″ blocks (6.5″ unfinished, 8.5″ unfinished, etc…).

Top US quilting blog and shop, Kate Colleran Designs, shares about new projects using quilt blocks and how to resize. Image is 4 pattern covers for 4 projects and the words Got Blocks?

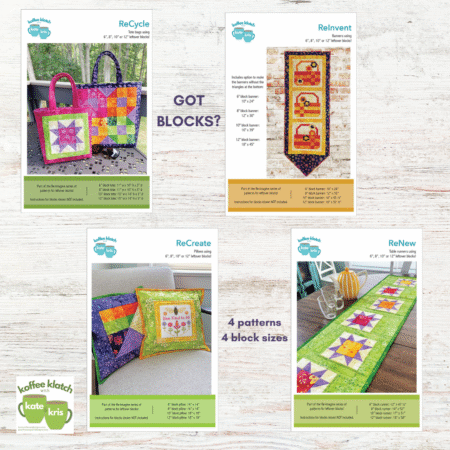
Here’s a link to the PDF page on my website to check out the patterns. Did you know the PDF patterns are on sale until October 31??

Different sized blocks

But, what if your block isn’t 6.5″ or 8.5″? Can you still use the patterns?

Yes, it just takes a little figuring out;  you know, just a little quilt math. I decided to show you want I did using graph paper.

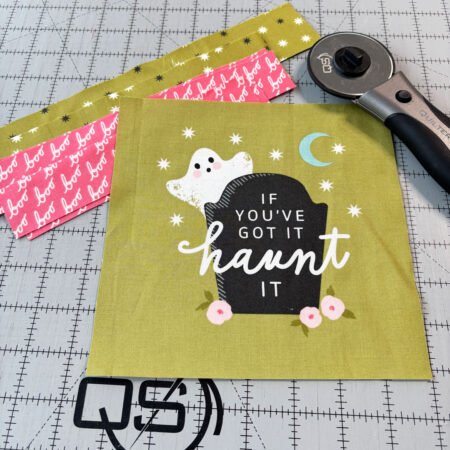
We had these leftover panels from our Halloween projects from last year, so I decided to use one of them on a tote. But my panel was 7 .75″ x 8″. Hmmm. What to do?

First I decided to cut it into a square. And I thought trimming it to 6.5″ was too small so I cut it to 7.5″. Now I could have added skinny little borders to make it 8.5″ and made the smaller tote in the pattern. BUT, I decided to make it into a 12.5″ block.

How to start? If you are good at quilt math, you can just do the math in your head. Kris kind of outlines that in her blog post so go check it out here!

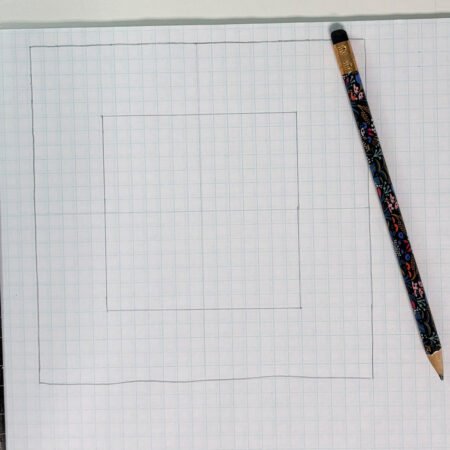
I chose to draw a 12″ square on graph paper with every square representing .5″ or, to say it another way, every 2 squares equals 1″.

Top US quilting blog and shop, Kate Colleran Designs, shares about new projects using quilt blocks and how to resize. Image is graph paper and pencil showing showing a block and center lines.

I drew lines down the middle of the block. Using the center lines, I drew my 7″ square. (Yes, I am ignoring seams allowances. I will add those later).

Top US quilting blog and shop, Kate Colleran Designs, shares about new projects using quilt blocks and how to resize. Image is graph paper and pencil showing a block and center lines.

That left me with 5 squares or 2.5″. My options were to add 1 border or 2 borders. If I added 1 border, I would need to cut strips 3″ to allow for the .25″ seam allowance on both sides. (2.5″ +.25″ +.25″ = 3″). Make sense?

Top US quilting blog and shop, Kate Colleran Designs, shares about new projects using quilt blocks and how to resize. Image is graph paper and pencil showing border sizes.

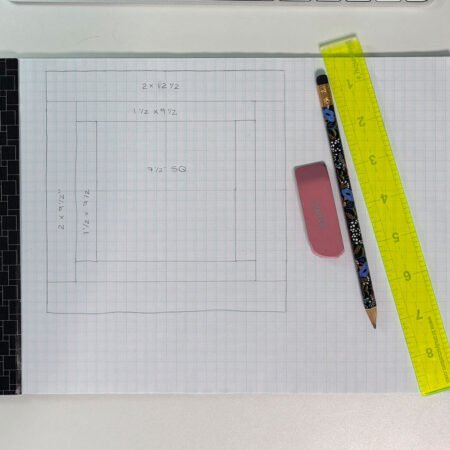
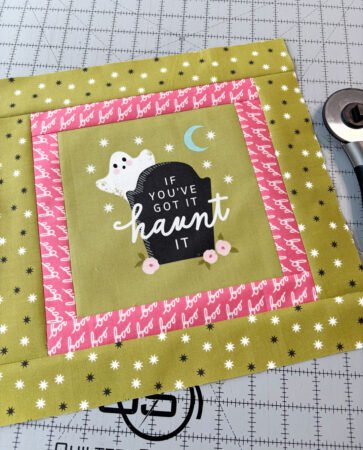
I decided to add 2 borders. The first one is 1″ wide and the second is 1.5″ wide. So for the first border I cut strips 1.5″ wide and strips 2″ wide for the second border.

Top US quilting blog and shop, Kate Colleran Designs, shares about new projects using quilt blocks and how to resize. Image is a green halloween panel with a ghost and pink and green borders strips.

This is my finished 12.5″ block!!

Top US quilting blog and shop, Kate Colleran Designs, shares about new projects using quilt blocks and how to resize. Image is a green Halloween panel with a ghost with pink and green borders.

My Recycle tote with panel

And here is my tote front all quilted and ready to go.

Top US quilting blog and shop, Kate Colleran Designs, shares about new projects using quilt blocks and how to resize. Image is of a green Halloween panel with pink, green and black borders.

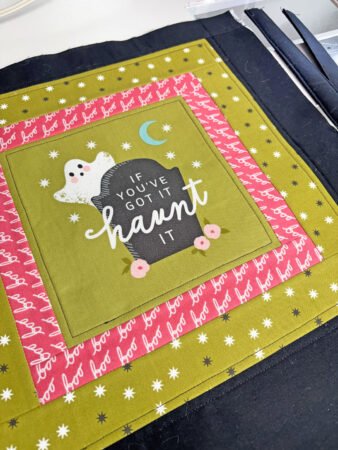
The tote came out so cute!


Top US quilting blog and shop, Kate Colleran Designs, shares about new projects using quilt blocks and how to resize. Image is of a green Halloween panel with pink, green and black borders made into a tote bag.

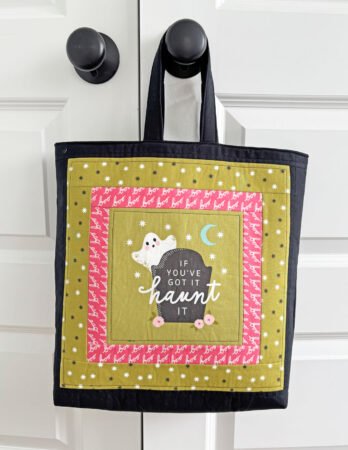
I think I may have to take it to go shopping for Halloween candy!

And you know what? Not only was the panel a leftover, all the fabrics I used were leftovers – they came from Kris from her stash or from my stash. What a great finish!

As you can see, simple graph paper can really help you figure out what to do with your leftover block if it doesn’t exactly match the pattern. It is possible to use any size up to 12″ and make it work!

happy quilting!

Kate


p.s. Creative Spark is at it again! Another great new Live program to check out! It’s called Quilt Fusion and it’s happening on Nov 13th, 2025!

Click here or on the image below to check it out and use my affiliate code to save $$!

When you use an affiliate link to purchase, I may make a small amount but you pay nothing extra. It just buys me a half a cup of coffee!

Halloween toteRecycle totereimagine quilt blocksresize blocks
About Kate

About Kate

Hi! I'm Kate Colleran, a designer who creates quilt patterns, fabric and surface designs. I lecture and teach about quilting. Welcome to my online home!

Related Posts

Exploring quilting basics: the Dutchman’s Puzzle quilt block

Post navigation

September Block Remix – Maple Leaf block

Leave a Reply Cancel reply

Your email address will not be published. Required fields are marked *

Dreaming In Color

Dreaming In Color

Hi, and welcome to my blog, Dreaming In Color.

There are posts with tips on making quilts, tutorials and information on my newest patterns and designs. Enjoy!

~Kate

Categories

  • A Quilter's Alphabet (22)
  • Block of the Month (28)
  • Blog Hops and Quilt Alongs (274)
  • Exploring Quilting Basics (84)
  • Fabric and Surface Pattern Design (10)
  • Holiday Quilts (32)
  • Quilt Community (176)
  • Quilt Patterns (219)
    • Bags & Small Quilts (71)
    • Braid Projects (20)
    • Braid Quilts (10)
    • Fat Quarter Patterns (21)
    • Jelly Roll Quilt Patterns (5)
    • Precut Quilt Patterns (21)
  • Quilt Projects (77)
  • Quilt Studio Tips (35)
  • Quilt Tutorials (24)
  • Quilting & Sewing Gift Ideas (8)
  • Quilting Essentials (4)
  • Quilting Giveaways (187)
  • Quilting Tips & Tutorials (38)
  • Quilting Tools & Books (73)
  • Reviews (3)
  • Series (7)
  • Testimonials (3)
  • Uncategorized (9)

Search Posts

Sign up for my newsletter and receive a free quilt pattern!

Sign up for my newsletter, Behind the Seams, to keep up to date with news, promotions, giveaways and more!

Enter your email below to get started and get your free quilt pattern!

Thank you!

You have successfully joined our subscriber list.

.

Recent Posts

  • ReImagine Projects – How to resize for your block!
  • Jingle Bell Pines Block Party- Setting Block and Borders
  • Jingle Bell Pines Block Party – Block 9 Holiday Lights
  • Jingle Bell Pines Block – Party Block 8 Tree Topper
Check out Craftsy's Free Classes!

Archives

  • Quick Links
  • Wholesale Shop
  • Pattern Updates
  • Privacy Policy
  • Store Policies
  • Contact
Copyright © 2025 | All Rights Reserved | Kate Colleran Designs LLC