Skip to content
  • Shop
  • About
  • Portfolio
    • Quilt Patterns
    • Fabric Design
    • Surface Pattern Design
  • Learn
    • Classes
    • Lectures
    • On-Line Classes
    • Tips and Tutorials
    • Quilt Along
  • Blog
  • Contact
  • Shop
  • About
  • Portfolio
    • Quilt Patterns
    • Fabric Design
    • Surface Pattern Design
  • Kate Colleran Designs
  • Learn
    • Classes
    • Lectures
    • On-Line Classes
    • Tips and Tutorials
    • Quilt Along
  • Blog
  • Contact
A Quilter's Alphabet

A Quilter’s Alphabet: I for Inset Seams, In the Ditch and Interfacing

January 13, 2021January 12, 2021 Post a comment

Hi friends!

Today in the A Quilter’s Alphabet series, Tammy are on the letter I. I will talk about inset seams, interfacing and in the ditch quilting! Let’s get started!

Inset Seams

Inset seams, or set-in seams or Y seams, are a type of seam used when you can sew a continuous straight line. This is when 3 pieces of fabric come together at angles other than 90 degrees.

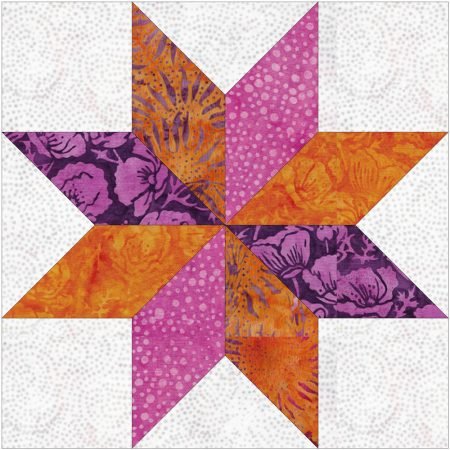
A common quilting block that uses Y seams or inset seams is the LeMoyne Star. 

A Quilter's Alphabet, featured by top US quilting blog and shop Seams Like a Dream Quilt Designs explains Inset Seams, In the Ditch quilting and Interfacing.

Sewing inset seams isn’t tricky, just fussy.

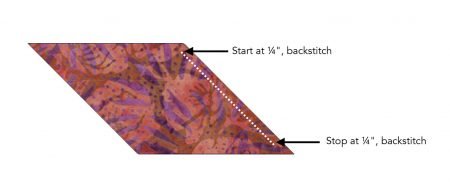
Lay the first 2 pieces, right sides together. Sew the first seam from the ¼” mark to the ¼” mark leaving the ends of the seams open. Be sure to backstitch at the beginning and the end of the seam to keep it from pulling apart.

A Quilter's Alphabet, featured by top US quilting blog and shop Seams Like a Dream Quilt Designs explains Inset Seams, In the Ditch quilting and Interfacing.

Sew the second seam by matching the ¼” marks and sew from mark to mark. Repeat with the third seam.

A Quilter's Alphabet, featured by top US quilting blog and shop Seams Like a Dream Quilt Designs explains Inset Seams, In the Ditch quilting and Interfacing.

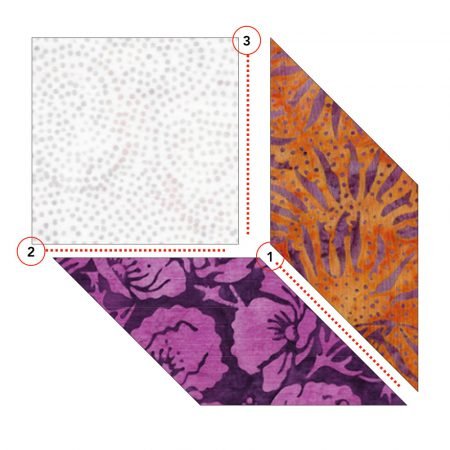
Keep doing this to sew all the sections of the block and to sew the sections together.

Interfacing

Interfacing is a material used to back another fabric to give it more stability. The material for interfacing can be light or heavy depending on how much stability is needed. The material can be adhered to the back of the fabric with stitching or fused.

Fusible interfacing usually has fusible on one side; that side will feel rough. Every interfacing requires different amounts of heat and pressure to fuse it to your fabric so be sure to always follow the manufacturer’s instructions for that fusible you are using!

In the Ditch Quilting

In the ditch quilting is also called stitch in the ditch! It is when you stitch right next to the seams in the quilt. It is a great technique to highlight shapes or your blocks.

A Quilter's Alphabet, featured by top US quilting blog and shop Seams Like a Dream Quilt Designs explains Inset Seams, In the Ditch quilting and Interfacing.

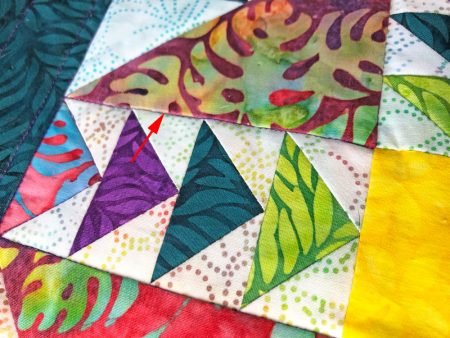
This type of quilting works best when the seams of the blocks are pressed to one side. If you stitch in the ditch next to seams that were pressed open, you could pull the seams apart.

I hoped you enjoyed learning a little about inset seams, interfacing and in the ditch quilting! Now, head on over to Tammy’s post to check out her information on ironing, inside corners and points and improvisational quilting!

A Quilter's Alphabet, featured by top US quilting blog and shop Seams Like a Dream Quilt Designs explains Inset Seams, In the Ditch quilting and Interfacing.

Next week we will be chatting about Partial Quarter Square Triangle blocks in the Exploring the Basics series! See you then!

Happy quilting,

Kate

inset seamsinterfacingstitch in the ditch
About Kate

About Kate

Hi! I'm Kate Colleran, a designer who creates quilt patterns, fabric and surface designs. I lecture and teach about quilting. Welcome to my online home!

Related Posts

A Quilter’s Alphabet: Letter S – Stitch in the Ditch Quilting, seam allowance, sashiko, and the satin stitch.

Post navigation

A Quilter’s Alphabet: G for Grain
A Quilter’s Alphabet: J and K as in Jelly Roll, and Knife Edge Finish

Leave a Reply Cancel reply

Your email address will not be published. Required fields are marked *

Dreaming In Color

Dreaming In Color

Hi, and welcome to my blog, Dreaming In Color.

There are posts with tips on making quilts, tutorials and information on my newest patterns and designs. Enjoy!

~Kate

Categories

  • A Quilter's Alphabet (22)
  • Block of the Month (27)
  • Blog Hops and Quilt Alongs (264)
  • Exploring Quilting Basics (83)
  • Fabric and Surface Pattern Design (9)
  • Holiday Quilts (32)
  • Quilt Community (176)
  • Quilt Patterns (219)
    • Bags & Small Quilts (71)
    • Braid Projects (20)
    • Braid Quilts (10)
    • Fat Quarter Patterns (21)
    • Jelly Roll Quilt Patterns (5)
    • Precut Quilt Patterns (21)
  • Quilt Projects (77)
  • Quilt Studio Tips (35)
  • Quilt Tutorials (24)
  • Quilting & Sewing Gift Ideas (8)
  • Quilting Essentials (4)
  • Quilting Giveaways (183)
  • Quilting Tips & Tutorials (38)
  • Quilting Tools & Books (72)
  • Reviews (3)
  • Series (7)
  • Testimonials (3)
  • Uncategorized (9)

Search Posts

Sign up for my newsletter and receive a free quilt pattern!

Sign up for my newsletter, Behind the Seams, to keep up to date with news, promotions, giveaways and more!

Enter your email below to get started and get your free quilt pattern!

Thank you!

You have successfully joined our subscriber list.

.

Recent Posts

  • Meet Chalk Hill Blue quilt pattern!
  • The Nordic Stars Quilt Along is open!!
  • Patchwork Braids – adding squares to a braid
  • Patchwork Braids – Braids with varying strip sizes!

Shop ElectricQuilt.com

Check out Craftsy's Free Classes!

Archives

  • Quick Links
  • Wholesale Shop
  • Pattern Updates
  • Privacy Policy
  • Store Policies
  • Contact
Copyright © 2025 | All Rights Reserved | Kate Colleran Designs LLC