Skip to content
  • Shop
  • About
  • Portfolio
    • Quilt Patterns
    • Fabric Design
    • Surface Pattern Design
  • Learn
    • Classes
    • Lectures
    • On-Line Classes
    • Tips and Tutorials
    • Quilt Along
  • Blog
  • Contact
  • Shop
  • About
  • Portfolio
    • Quilt Patterns
    • Fabric Design
    • Surface Pattern Design
  • Kate Colleran Designs
  • Learn
    • Classes
    • Lectures
    • On-Line Classes
    • Tips and Tutorials
    • Quilt Along
  • Blog
  • Contact
Blog Hops and Quilt Alongs

Jingle Bell Pines Block Party Block 1 Santa’s Hat!

July 24, 2025July 24, 2025 1 comment

Hi friends!

It’s time for the Jingle Bell Pines Block Party to get started!; let’s start with Block 1  Santa’s Hat!

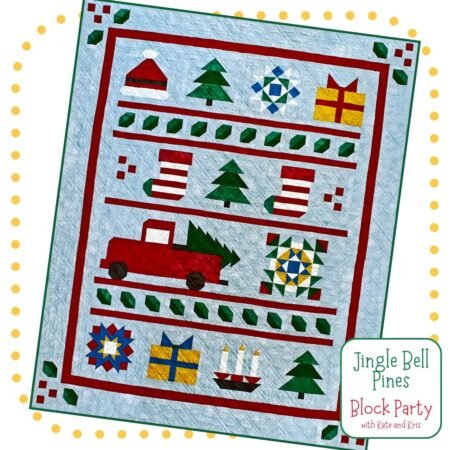
If you want to know more about what this Block Party is all about, click here for the Intro post!


Block 1 Santa’s Hat

The first block in the pattern is Santa’s Hat. Just a fun, cute and really easy hat block! 

Top US quilting blog and shop, Kate Colleran Designs, shares about Jingle Bell Pines Block Party and tips for Block 1 Santa's Hat! Image is a red and white Santa Hat quilt block with a medium blue background


For each block, we are also showing what it would look like with a navy background or a khaki colored background.


Here is the navy blue block:

Top US quilting blog and shop, Kate Colleran Designs, shares about Jingle Bell Pines Block Party and tips for Block 1 Santa's Hat! Image is a red and white Santa Hat quilt block with a navy blue background


And here is the khaki block:

Top US quilting blog and shop, Kate Colleran Designs, shares about Jingle Bell Pines Block Party and tips for Block 1 Santa's Hat! Image is a red and white Santa Hat quilt block with a khaki background


What techniques do you need to know to make this block? Just stitch ‘n flip!!!

Stitch ‘n Flip – what is it?

In quilting there are so many different ways to make the same unit. Stitch ‘n flip is a great technique to add a triangle in the corner of a square or rectangle. 

To do stitch ‘n flip, you draw a diagonal line corner to corner on the wrong side of the small square. 

Position the square in the proper corner of the second piece and line up along the raw edges. 


Top US quilting blog and shop, Kate Colleran Designs, shares about Jingle Bell Pines Block Party and tips for Block 1 Santa's Hat! Image is a red rectangle of fabric with a white square on top and sewing lines noted with an arrow

Sew on the line; trim the seam allowance to ¼” and press the top triangle to the corner.

Top US quilting blog and shop, Kate Colleran Designs, shares about Jingle Bell Pines Block Party and tips for Block 1 Santa's Hat! Image is a red rectangle of fabric with a white square on top and trim lines noted with an arrow

And ta-done!

Top US quilting blog and shop, Kate Colleran Designs, shares about Jingle Bell Pines Block Party and tips for Block 1 Santa's Hat! Image is a red rectangle of fabric with white triangles on top.

Easy!

We used this technique in various spots in this block. So how about we cover tips and tools for stitch ‘n flip?

Here’s the big question: Do you trim both layers of fabric or just the middle one? 

As you can see from the picture above. Kris and I trim both; I don’t want the extra fabric in the quilt. But really, there is no wrong answer, only personal preference!


Stitch ‘n Flip – tips for Block 1 Santa’s Hat

One reason quilters may struggle with this technique is because when they flip the small triangle, it is not big enough to cover the area it should. 

First, to check that your triangle will cover the area, fold the triangle to the corner BEFORE trimming to see if you can see any of the wrong side of the triangle fabric. If you can, you need to adjust.

Turn the piece over to see if the top triangle extends out past the edges of the lower fabric; it shouldn’t.

If everything lines up, great! Trim the seam allowance and press. You are good to go!


The fix: if when you folded the triangle back you could see the wrong side of the triangle fabric on the top of the block, the piece is too small. To fix this, sew just OUTSDE the drawn line, not ON the drawn line. Towards the corner. This allows room for the fold of the fabric. 

Top US quilting blog and shop, Kate Colleran Designs, shares about Jingle Bell Pines Block Party and tips for Block 1 Santa's Hat! Image is a red rectangle of fabric with a white square on top and sewing lines noted with an arrow


Of course, if now the piece is too big, and you can see it on the backside, you sewed too far away from the corner line. All you need to do is find the sweet spot! The thickness of your fabric and the thickness of your thread all take up space so it is not exactly a one size fits all situation!

Want more information on Stitch ‘n Flip? Check out my Exploring the Basics blog post on it here!

Stitch ‘n Flip- my favorite drawing tools

Everyone has their favorite drawing tools and if you have tools you love, then you are good to go! But if you are still searching for ones that work for you, here are my favorites. 

A sand board


Why use a sand board? The fabric sticks to the sand board so it doesn’t move around when you draw your lines. 

Top US quilting blog and shop, Kate Colleran Designs, shares about Jingle Bell Pines Block Party and tips for Block 1 Santa's Hat! Image is a black sand board with 2 squares of white fabric.


You can purchase a sand board (see above one that is black) or you can easily make one using a cardboard box cut to the size of a piece of sandpaper and then just glue them together.

Top US quilting blog and shop, Kate Colleran Designs, shares about Jingle Bell Pines Block Party and tips for Block 1 Santa's Hat! Image is a sand board with 2 white squares of fabric.

Easy and inexpensive. 

Maybe not pretty but practical!

Pencils

My favorite marking pencils are the Sew Line pencils. I have the white one, the pink one, and the regular charcoal one.

Top US quilting blog and shop, Kate Colleran Designs, shares about Jingle Bell Pines Block Party and tips for Block 1 Santa's Hat! Image is 3 Sewline pencils with white lead, pink lead and charcoal lead.

Why do I like these? Because the pencil draws a very slim line. A slim line means I am less likely to sew too far in one direction and then it’s less likely for things not to match up. 

Ruler

You can use any straight ruler to draw your lines. But, I usually use the Quilter’s Magic Wand for drawing lines. If I just need a diagonal line, it is a long, thin ruler and easy to maneuver. 

Top US quilting blog and shop, Kate Colleran Designs, shares about Jingle Bell Pines Block Party and tips for Block 1 Santa's Hat! Image is a sand paper board with a white fabric square and 3 rulers in yellow-green, pink and blue.

If I am using it for other things and need to draw a ¼” line, it is a nice scant ¼”. 

Do you have a favorite tool for drawing lines?


Don’t forget to go to Kris’ blog and see what her favorite tools are!!

Have fun making Block 1 Santa’s Hat – you only need to make 1 block this week – and next week we will move onto Block 2!! 


happy quilting!

Kate

Please note: we are not sharing any cutting information or sizes; you must have the pattern to make the block.

Interested in purchasing the pattern? Click here to go to Kris’ website!

block partyholiday quiltholiday quilt blocksJingle Bell Pines BOM
About Kate

About Kate

Hi! I'm Kate Colleran, a designer who creates quilt patterns, fabric and surface designs. I lecture and teach about quilting. Welcome to my online home!

Related Posts

Jingle Bell Pines Block Party!
In case you don’t have enough to do this month…
My December Island Batik Ambassador project

Post navigation

The Nordic Stars Quilt Along is open!!

One comment

  1. Barbara says:
    July 25, 2025 at 10:27 am

    Can’t wait to use the Judt Dandy strips in a project.

    Reply

Leave a Reply Cancel reply

Your email address will not be published. Required fields are marked *

Dreaming In Color

Dreaming In Color

Hi, and welcome to my blog, Dreaming In Color.

There are posts with tips on making quilts, tutorials and information on my newest patterns and designs. Enjoy!

~Kate

Categories

  • A Quilter's Alphabet (22)
  • Block of the Month (28)
  • Blog Hops and Quilt Alongs (265)
  • Exploring Quilting Basics (83)
  • Fabric and Surface Pattern Design (10)
  • Holiday Quilts (32)
  • Quilt Community (176)
  • Quilt Patterns (219)
    • Bags & Small Quilts (71)
    • Braid Projects (20)
    • Braid Quilts (10)
    • Fat Quarter Patterns (21)
    • Jelly Roll Quilt Patterns (5)
    • Precut Quilt Patterns (21)
  • Quilt Projects (77)
  • Quilt Studio Tips (35)
  • Quilt Tutorials (24)
  • Quilting & Sewing Gift Ideas (8)
  • Quilting Essentials (4)
  • Quilting Giveaways (186)
  • Quilting Tips & Tutorials (38)
  • Quilting Tools & Books (73)
  • Reviews (3)
  • Series (7)
  • Testimonials (3)
  • Uncategorized (9)

Search Posts

Sign up for my newsletter and receive a free quilt pattern!

Sign up for my newsletter, Behind the Seams, to keep up to date with news, promotions, giveaways and more!

Enter your email below to get started and get your free quilt pattern!

Thank you!

You have successfully joined our subscriber list.

.

Recent Posts

  • Jingle Bell Pines Block Party Block 1 Santa’s Hat!
  • Christmas in July- another fabric giveaway post!!
  • Chalk Hill Blue Fabric Giveaway!
  • Recoloring a quilt and a fabric Giveaway!
Check out Craftsy's Free Classes!

Archives

  • Quick Links
  • Wholesale Shop
  • Pattern Updates
  • Privacy Policy
  • Store Policies
  • Contact
Copyright © 2025 | All Rights Reserved | Kate Colleran Designs LLC