Welcome to our series exploring the basics of quilting! Last time, we discussed the square in a square technique. Next time, we’ll be looking at half rectangle triangle blocks. To see all the posts in this series, click here.
Hi Friends!
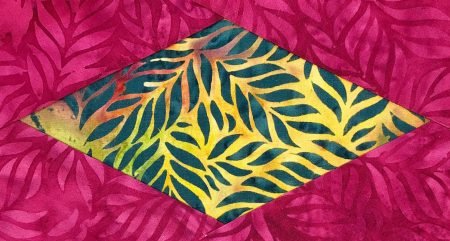
Today in the Exploring the Basics series, Tammy and I are chatting about the diamond rec unit- or a diamond in a rectangle quilt block!
Diamond in a Rectangle Quilt Block
This unit can be a block or a unit in a block. I have seen it used as a border block on a quilt.
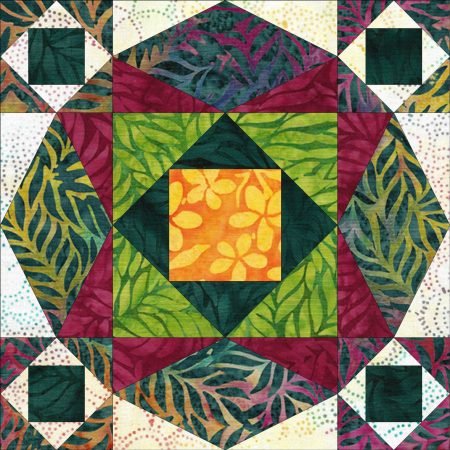
Or in the classic Storm at Sea block. In this block, the triangles on each side of the unit are different fabrics.
A quilter might look at this unit and wonder, just how do I piece that? I know I thought that when I first saw it! Let’s explore a few ways you can piece this block.
Paper Piecing
One way is to paper piece the diamond in a rectangle quilt block.

Easy peasy!
If you need information on paper piecing, click here to go to the post with tips on that technique.
Piecing
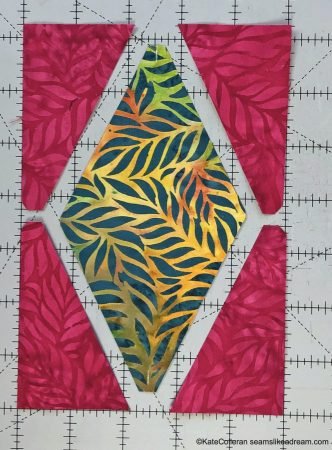
You can cut a diamond and 4 triangles and sew them together into the unit. How would you cut them? One way is to use the Triangle Recs rulers, or the Creative Grids Triangle Squares and Perfect Rectangle rulers.
Once you know the size of the block (or unit), cut your strips. Mine will finish at 3″ x 6″ so I am going to cut 6 ½” strips for my diamond and 3 ½” strips for my triangles.
Cutting the triangles is easy – just line up the toll with your strip and cut.
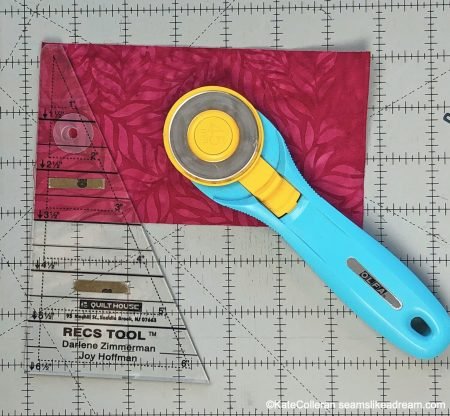
Rotate the tool to make the next cut.

The diamond is a little trickier since you are cutting it using a triangle ruler!
From the 6½” strip, cut a rectangle 6 ½” x 3 ½”. Mark the center of your piece on both ends. You can make a fold or use a pencil to make a little mark.

Line up the top of the ruler with the top of the fabric, keeping the ruler centered. Make cuts on both sides of the ruler.
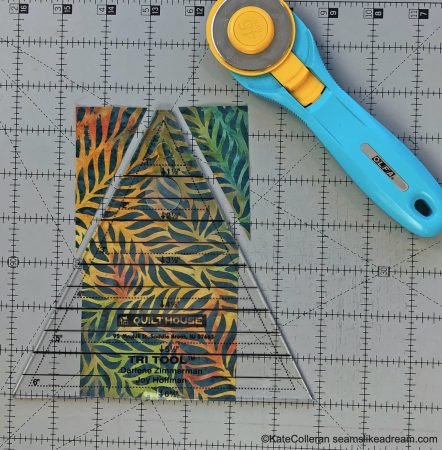
Flip the fabric piece around and repeat on the other side. Ta-done! A diamond shape!

Add the triangles to 2 sides, then the other 2 sides and you have your diamond in a rectangle block.
Piecing 2 smaller units
Another way to make the block is to make 2 smaller units. Cut 2 squares instead of the diamond (my squares were 3 ½” x 3 ½”).

Sew 2 of the triangles to the sides of each square and then sew the squares together into the diamond shape.
It’s always good to have options when deciding how to piece a block or unit. One way may work for you and another may work for your friend! For me, I would just go ahead and paper piece it! It took too much time to try to line everything up just right! But that’s me!
Tammy will be using the Studio 180 Diamond Rec tool to show you another way to piece the block. Click here to get the scoop! Then let me know what method you think would work for you. You might even have other methods we can all try out!
In the next Exploring the Basics post, we will work on the Half Rec block!
happy quilting!
Kate
Like this post? Pin it!!!
Lots of videos out there on how to use these two rulers, but surprisingly few videos on how to make the Diamond in a Rectangle unit. Thank you for clear, succinct instructions!
You should look into trying Studio 180 Design’s tool for making these units, the Diamond Rects. It does a bunch of different sizes, pieced larger and trimmed to size, and only uses one tool (so you don’t have to keep track of different rulers for making a single unit).
Liz,
Thanks for the suggestion; they do have some great tools. I only have a couple of them but they are great. And I believe Tammy shared that one in her post on Diamond Recs- she loves their tools!
Thank you for this! Do you know where I can find a free paper piecing pattern for a 4″x8″ diamond in a rectangle block? 🙂
Heather,
Not off the top of my head. I am sure you could draw one pretty easy with graph paper though!