Skip to content
  • Shop
  • About
  • Portfolio
    • Quilt Patterns
    • Fabric Design
    • Surface Pattern Design
  • Learn
    • Classes
    • Lectures
    • On-Line Classes
    • Tips and Tutorials
    • Quilt Along
  • Blog
  • Contact
  • Shop
  • About
  • Portfolio
    • Quilt Patterns
    • Fabric Design
    • Surface Pattern Design
  • Kate Colleran Designs
  • Learn
    • Classes
    • Lectures
    • On-Line Classes
    • Tips and Tutorials
    • Quilt Along
  • Blog
  • Contact
Quilt Tutorials

How to make Flying Geese Units 4 at once with 3 colors!

October 20, 2021October 19, 2021 3 comments

Hi friends!

This month as I was working on my October Imagination Renovation Block Challenge, I had a piecing dilemma. 

The Block

This month’s block is the Dutchman’s Puzzle.

Top US quilting blog and shop, Kate Colleran Designs, shares about making flying geese units, 4 at once, with 3 colors!

The basic block has flying geese units in it. And each unit is made of 2 colors.

Next week, as part of the Exploring the Basics blog series, I will share my reimagined block! 

The Dilemma

Here was my dilemma, can I still piece the flying geese units using my favorite 4 at once method (AKA the No Waste method) if I need the geese to be made of 3 colors and with each geese unit looking exactly the same?

Top US quilting blog and shop, Kate Colleran Designs, shares about making flying geese units, 4 at once, with 3 colors!

Piecing using flying geese units 

In this previous blog post, I shared different ways to make FG units, including the 4 at once method. In this method,  from 4 small squares and 1 large square you end up with 4 flying geese units that look all the same.

If you were to follow the same method but use 2 different small squares, you would end up with 4 FG units that are similar, but they are actually 2 sets of mirror images- not all exactly the same.

I wanted my FG units to use 3 fabrics but look all the same. One easy way to do this would be to cut the squares into triangles and sew the units together the old fashioned way.

But I wondered, can I use the 4 at once method and make it work? And yes, I can! Now you may know another way to make this work but here is how I did it.

The Solution!

I started the same way, with 4 small squares- 2 of each of my “side” fabrics and 1 large square for the geese.

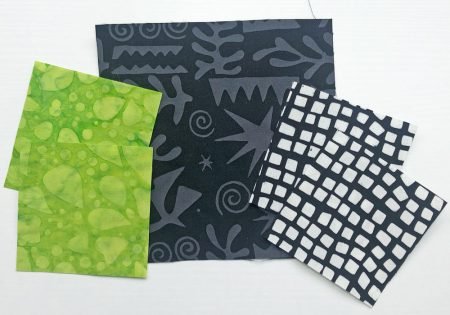
Here is what changed. While I did not cut my large square into 4 pieces, I did cut my small squares in half on the diagonal once for 2 small triangles from each square.

I lined up 2 of the triangles, 1 of each color, onto the large square just like you would 1 with one small square. 

Then I added 2 more triangles, making sure to alternate the fabrics. 

Top US quilting blog and shop, Kate Colleran Designs, shares about making flying geese units, 4 at once, with 3 colors!

Then I sewed ¼” away from the diagonal line on both sides, cut the piece apart and pressed.

I again added the triangles alternating the colors, sewed, cut and pressed!Top US quilting blog and shop, Kate Colleran Designs, shares about making flying geese units, 4 at once, with 3 colors!

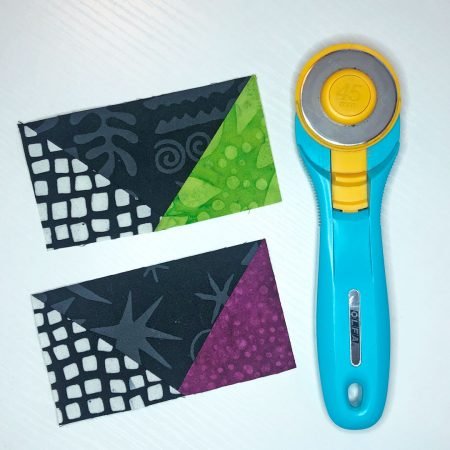
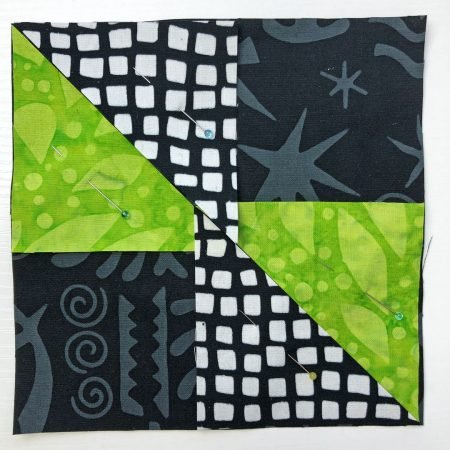
Ta-done! All my geese have the green on the right.

The Tips

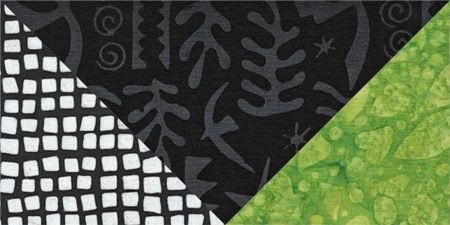
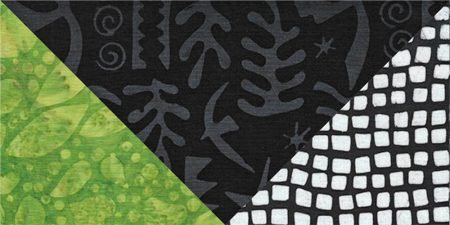
When doing this, you just need to know which side you want the colors to end up on. For my units, I wanted the “color”- green or purple- on the right side when the black geese was pointing down and the black and white check on the left side. (see above)

So, to piece the units the way I wanted, , the “color” triangle needed to be in the upper left and lower right. Once you know where to place the colors, the process is Easy Peasy!

I hope that made sense for you- the trickiest part is knowing where to place each color to start. After that just always alternate the colors and you are good to go!

Next week I will show you my reimagined block and the project I made using the new block!

happy quilting!

Kate

flying geeseflying geese unitsNo Waste Flying Geese method
About Kate

About Kate

Hi! I'm Kate Colleran, a designer who creates quilt patterns, fabric and surface designs. I lecture and teach about quilting. Welcome to my online home!

Related Posts

Allure BOM Block 3 Tips
Exploring quilting basics: the Dutchman’s Puzzle quilt block
A Quilter’s Alphabet: F for Fat Eights, Fat Quarters, Flying Geese… and More!
Exploring the Quilting Basics: Flying Geese Tutorial

Post navigation

Quilting Tutorial: How to Make Crumb Quilt Blocks
How to easily cut quilt squares on the diagonal

3 comments

  1. Susan says:
    October 21, 2021 at 10:01 am

    I don’t see it. Confusing. Do you have a video?

    Reply
    1. Susan says:
      October 21, 2021 at 10:04 am

      Ok, I found your Basics of flying geese and now I see it. Thanks.

      Reply
      1. Kate Colleran says:
        October 25, 2021 at 10:32 am

        Susan,
        Glad you found the other post that helps tie it all together!

        Reply

Leave a Reply Cancel reply

Your email address will not be published. Required fields are marked *

Dreaming In Color

Dreaming In Color

Hi, and welcome to my blog, Dreaming In Color.

There are posts with tips on making quilts, tutorials and information on my newest patterns and designs. Enjoy!

~Kate

Categories

  • A Quilter's Alphabet (22)
  • Block of the Month (27)
  • Blog Hops and Quilt Alongs (264)
  • Exploring Quilting Basics (83)
  • Fabric and Surface Pattern Design (9)
  • Holiday Quilts (32)
  • Quilt Community (176)
  • Quilt Patterns (219)
    • Bags & Small Quilts (71)
    • Braid Projects (20)
    • Braid Quilts (10)
    • Fat Quarter Patterns (21)
    • Jelly Roll Quilt Patterns (5)
    • Precut Quilt Patterns (21)
  • Quilt Projects (77)
  • Quilt Studio Tips (35)
  • Quilt Tutorials (24)
  • Quilting & Sewing Gift Ideas (8)
  • Quilting Essentials (4)
  • Quilting Giveaways (183)
  • Quilting Tips & Tutorials (38)
  • Quilting Tools & Books (73)
  • Reviews (3)
  • Series (7)
  • Testimonials (3)
  • Uncategorized (9)

Search Posts

Sign up for my newsletter and receive a free quilt pattern!

Sign up for my newsletter, Behind the Seams, to keep up to date with news, promotions, giveaways and more!

Enter your email below to get started and get your free quilt pattern!

Thank you!

You have successfully joined our subscriber list.

.

Recent Posts

  • Patchwork Braids – Using pieced strips in a braid
  • Meet Chalk Hill Blue quilt pattern!
  • The Nordic Stars Quilt Along is open!!
  • Patchwork Braids – adding squares to a braid

Shop ElectricQuilt.com

Check out Craftsy's Free Classes!

Archives

  • Quick Links
  • Wholesale Shop
  • Pattern Updates
  • Privacy Policy
  • Store Policies
  • Contact
Copyright © 2025 | All Rights Reserved | Kate Colleran Designs LLC