Hi friends! How are you? Did you have a nice weekend?
I spent the weekend sewing. What a shocker, right? I had to get a couple of quilt tops done and I did it! I felt like I should celebrate!
One of the tops will be up at the Quilt~ a ~Fair quilt show September 25-26th. Are you going? It is up at the Boulder County Fairgrounds and here is a link for more information. I will be up there on Friday in the Fabric Expressions Quilt Shop booth. So if you are going up, come say hi! And we will have books to sign and other fun stuff.
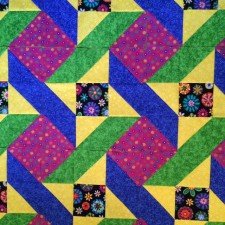 Oh right- the quilt! It is a version of Urban Twist. Don’t you love the bright colors? I love how different the quilt looks with different colors and fabrics.
One of the things I had a chance to work on this weekend were my Quiltmaker’s September Bitty Blocks. I only got a few made so far, but I wanted to share them with you.
This month’s the bitty block is a bitty Sawtooth Star. I LOVE this block! One of my favs. The Quiltmaker post has a great tutorial on how to make them, but I made mine a little differently so I wanted to show you that.
For the flying geese units, instead of cutting the rectangles and squares and using the Stitch and Flip method, I cut squares and used the Easy Flying Geese method.
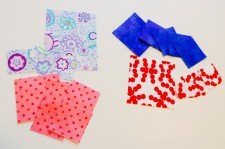 For the background fabric of the block, I cut 4 squares 1 ½” x 1 ½” and 1 square 3 ¼”.
For the star fabric, I cut 1 square 2 ½” x 2 ½” and 4 squares 1 ⅞” x 1 ⅞”.
I have a PDF of the Easy Flying Geese method and I updated it- I corrected a typo(!) and I added the small 1″ x 2″ (finished) geese since my original handout did not go that small!
I have shown this technique before, but in case you missed it, here are the basic steps.
 First draw a line corner to corner on the 1 ⅞” squares. (OR, draw 2 lines ¼” from the center line.) Place 2 squares on the 3 ¼” square as shown and sew ¼” away from the diagonal line. (OR, on the 2 lines you drew.)

Cut along the diagonal line and press the little triangles back.
Add one of the last 1 ⅞” squares and sew again. (Sorry for the change in fabric but I forgot to take a picture of this step!)
Cut along the diagonal line, press, trim the little dog ears, repeat with the second piece and you will have a total of 4 Flying Geese units, 1 ½” x 2 ½”, all ready for your Sawtooth Star block.
 A note: if you find your geese are a little shy of the size you need, try sewing just inside your drawn lines. Sometimes the line is taking up some of our seam allowance!
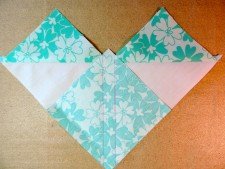
 Here are 4 of my blocks. Now I am off to go make a few more. Have fun with your bitty blocks!
Here is the link to the Tips and Freebies page and my free PDF on Easy Flying Geese.
Have a groovy week!
happy quilting,
Kate