Skip to content
  • Shop
  • About
  • Portfolio
    • Quilt Patterns
    • Fabric Design
    • Surface Pattern Design
  • Learn
    • Classes
    • Lectures
    • On-Line Classes
    • Tips and Tutorials
    • Quilt Along
  • Blog
  • Contact
  • Shop
  • About
  • Portfolio
    • Quilt Patterns
    • Fabric Design
    • Surface Pattern Design
  • Kate Colleran Designs
  • Learn
    • Classes
    • Lectures
    • On-Line Classes
    • Tips and Tutorials
    • Quilt Along
  • Blog
  • Contact
Quilt Projects

Quiltmaker’s August Bitty Blocks

August 26, 2015July 28, 2020 2 comments

How did it get to be the end of August already? Where did this month go to? I have not checked off nearly enough things on my to do lists. Yikes.

Bitty Log Cabin blocks
My bitty Log Cabins- love them!

One of the things I wanted to get a chance to play with were the Quiltmaker Bitty Blocks for August. So the other day, I just dropped everything else and played for a couple of hours. This month they were making bitty Log Cabins. I LOVE Log Cabin blocks.

It was so much fun!

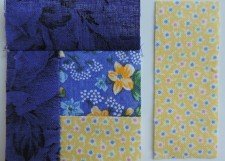
I did not worry about colors or wonder if all the blocks went together… I just grabbed my bin of fabric, found pieces that I liked and made a few blocks.

Here are a few tips to make them.

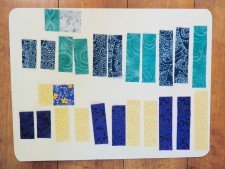
1. Lay out all your strips for each block in order. I used the backside of my sandboard so I could carry them from the cutting table to the sewing table.

Bitty Log Cabin layout

2. A good ¼” seam is crucial!

3. Finger press or press after each addition. I would finger press for 3 or 4 strips and then would take the block to the iron for a nice press. I would also trim after adding about 4 strips. Even when I ironed after each strip, I found a little trim kept me on track.

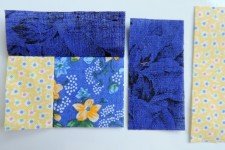
4. Trying to remember which side to add the next piece to??? Always place the piece you just added at the top and add the next one to the right edge.

Adding next strip
Adding next strip- last strip added was the blue one at the top.  Next strip is the next blue one.


Sew to the right edge of the block


Next up, the yellow strip. The last added blue strip is at the top of the block.


I have a few more to make- I think I have enough scraps, don’t you?

scraps!
Can you believe all these scraps came from that one bin? Now I have to to put them back. Yikes!

Have you made any of the Quiltmaker Bitty Blocks? They really are fun and addictive! Click here to go to their page and get the free patterns.

happy quilting,

Kate

bitty blocks
About Kate

About Kate

Hi! I'm Kate Colleran, a designer who creates quilt patterns, fabric and surface designs. I lecture and teach about quilting. Welcome to my online home!

Related Posts

December Quiltmaker Bitty Blocks
November Quiltmaker Bitty Blocks
Quiltmaker’s September Bitty Blocks
Quilt Show and Bitty Blocks

Post navigation

Quilt Show and Bitty Blocks
Quiltmaker’s September Bitty Blocks

2 comments

  1. Robin says:
    September 5, 2015 at 3:59 pm

    I read somewhere that when doing tiny blocks you should use 1.8 stitch.

    Reply
  2. Kathleen says:
    August 27, 2015 at 8:39 am

    Thanks for the quick and concise tip for making the log cabin blocks. Yours are beautiful!

    Reply

Leave a Reply Cancel reply

Your email address will not be published. Required fields are marked *

Dreaming In Color

Dreaming In Color

Hi, and welcome to my blog, Dreaming In Color.

There are posts with tips on making quilts, tutorials and information on my newest patterns and designs. Enjoy!

~Kate

Categories

  • A Quilter's Alphabet (22)
  • Block of the Month (27)
  • Blog Hops and Quilt Alongs (264)
  • Exploring Quilting Basics (83)
  • Fabric and Surface Pattern Design (9)
  • Holiday Quilts (32)
  • Quilt Community (176)
  • Quilt Patterns (219)
    • Bags & Small Quilts (71)
    • Braid Projects (20)
    • Braid Quilts (10)
    • Fat Quarter Patterns (21)
    • Jelly Roll Quilt Patterns (5)
    • Precut Quilt Patterns (21)
  • Quilt Projects (77)
  • Quilt Studio Tips (35)
  • Quilt Tutorials (24)
  • Quilting & Sewing Gift Ideas (8)
  • Quilting Essentials (4)
  • Quilting Giveaways (183)
  • Quilting Tips & Tutorials (38)
  • Quilting Tools & Books (73)
  • Reviews (3)
  • Series (7)
  • Testimonials (3)
  • Uncategorized (9)

Search Posts

Sign up for my newsletter and receive a free quilt pattern!

Sign up for my newsletter, Behind the Seams, to keep up to date with news, promotions, giveaways and more!

Enter your email below to get started and get your free quilt pattern!

Thank you!

You have successfully joined our subscriber list.

.

Recent Posts

  • Patchwork Braids – Using pieced strips in a braid
  • Meet Chalk Hill Blue quilt pattern!
  • The Nordic Stars Quilt Along is open!!
  • Patchwork Braids – adding squares to a braid

Shop ElectricQuilt.com

Check out Craftsy's Free Classes!

Archives

  • Quick Links
  • Wholesale Shop
  • Pattern Updates
  • Privacy Policy
  • Store Policies
  • Contact
Copyright © 2025 | All Rights Reserved | Kate Colleran Designs LLC