Skip to content
  • Shop
  • About
  • Portfolio
    • Quilt Patterns
    • Fabric Design
    • Surface Pattern Design
  • Learn
    • Classes
    • Lectures
    • On-Line Classes
    • Tips and Tutorials
    • Quilt Along
  • Blog
  • Contact
  • Shop
  • About
  • Portfolio
    • Quilt Patterns
    • Fabric Design
    • Surface Pattern Design
  • Kate Colleran Designs
  • Learn
    • Classes
    • Lectures
    • On-Line Classes
    • Tips and Tutorials
    • Quilt Along
  • Blog
  • Contact
Exploring Quilting Basics

Exploring Quilting Basics: How to Do the Stitch and Flip Technique.

October 28, 2020January 27, 2021 1 comment

Welcome to our series Exploring Quilting Basics! Previously, we looked at ways to make the disappearing 4 patch block. Coming up next in our basics lineup is the square within a square technique. Or if you would like to start from the beginning and work through all the topics, you can find them all here. 


Hi friends!

Today in the Exploring the Basics series, Tammy and I are talking about the Stitch and Flip Technique.

I think this technique is one many quilters either love or hate! Which are you?

I have 2 tips for you to make this technique one you will be happy to use.

Stitch and Flip – the technique

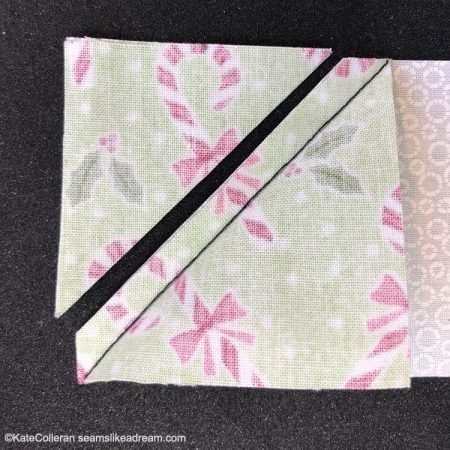
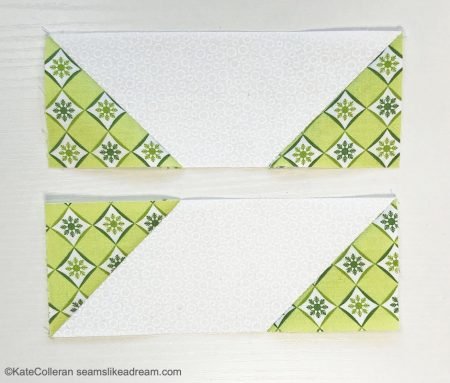
Let’s start with how to do the stitch and flip technique. The reason to use this technique is it a quick way is to be able to add a triangle to the edge of another unit- maybe a square, maybe a rectangle. And with this technique you don’t have to cut funny shapes or deal with bias.

Exploring Quilting Basics: How to Do the Stitch and Flip Technique, from top US quilting blog and shop, Seams Like a Dream Quilt Designs.

Instead you cut a square (or a rectangle) which is the same size as the height of whatever unit you are adding it to and draw a diagonal line, corner to corner, on the wrong side of the square.

Exploring Quilting Basics: How to Do the Stitch and Flip Technique, from top US quilting blog and shop, Seams Like a Dream Quilt Designs.

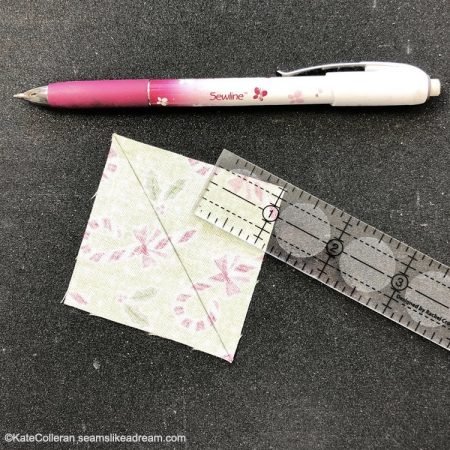
Note: This is different from how you draw lines for Half Square Triangles.

Place the square on the edge where you want to flip!

Exploring Quilting Basics: How to Do the Stitch and Flip Technique, from top US quilting blog and shop, Seams Like a Dream Quilt Designs.

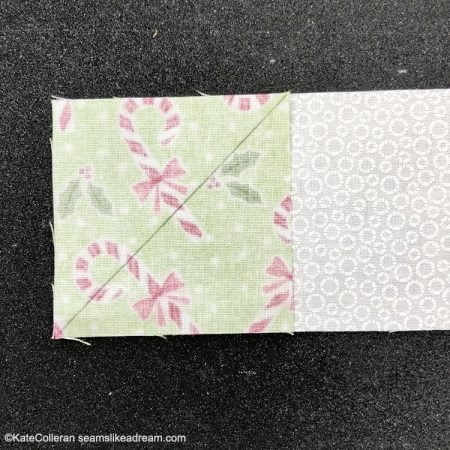
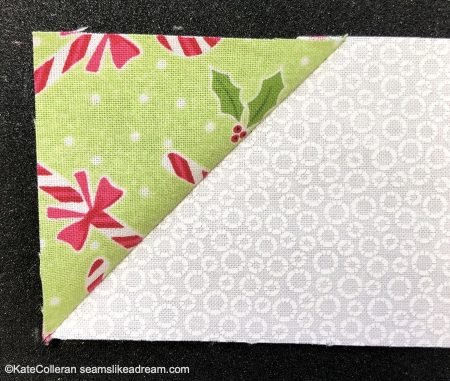
Sew on the line, trim the seam to ¼” and press to the piece you just added. Ta-done!

Exploring Quilting Basics: How to Do the Stitch and Flip Technique, from top US quilting blog and shop, Seams Like a Dream Quilt Designs.

Seems simple, right?

Stitch and Flip Tip #1

One reason quilters may not like this technique is when the piece to be flipped ends up too small.

Exploring Quilting Basics: How to Do the Stitch and Flip Technique, from top US quilting blog and shop, Seams Like a Dream Quilt Designs.

To help with that, remember to think about what you used to draw your diagonal line. If your pencil mark (or pen- whatever marker type you used) is thick, and you sew on the inside of the mark, your piece may end too small.


This is the reason some quilters don’t cut both lower layers but I think keeping two layers is not necessary and can add bulk.

Plus if the lower layer is darker, it may show through!

Try this instead- once you draw the line, sew to the outside of the line and keep your eye on the corner.

Exploring Quilting Basics: How to Do the Stitch and Flip Technique, from top US quilting blog and shop, Seams Like a Dream Quilt Designs.

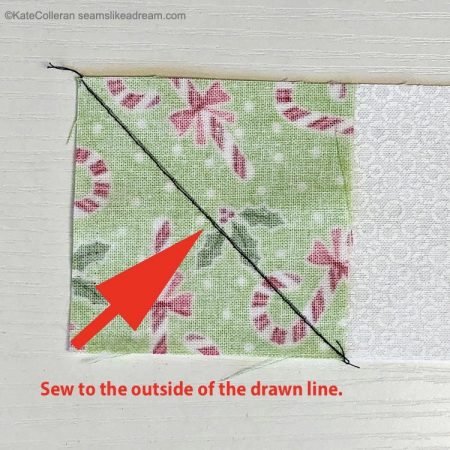
As you get close to the end of the sewing, just aim for the corner!

Stitch and Flip Tip #2

What if your piece ends up too big and your unit isn’t the right size?

Exploring Quilting Basics: How to Do the Stitch and Flip Technique, from top US quilting blog and shop, Seams Like a Dream Quilt Designs.

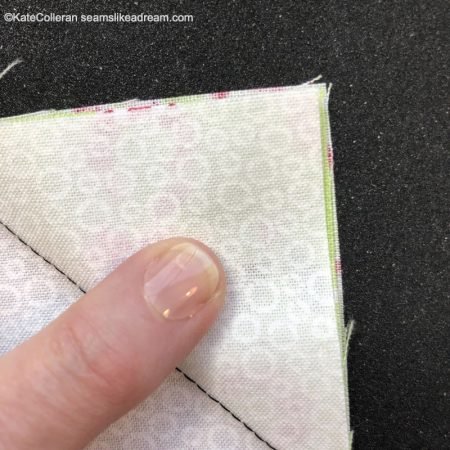
Instead of trimming the seam allowance and then pressing the triangle, once you have sewn the two pieces together, start with pressing the triangle you just sewed.

First, is your triangle too small? If yes, then try again! You may need to look at tip #1.

Then turn the unit over. Look to see if you can see any of the triangle fabric peeking around the outer edges of the lower fabric. Trim any little bits sticking out.

If there are big bits showing, well, maybe you need to pull out Jack and sew again!

Then trim your ¼” seam. And press the triangle again. A little extra work but increases accuracy!

Exploring Quilting Basics: How to Do the Stitch and Flip Technique, from top US quilting blog and shop, Seams Like a Dream Quilt Designs.

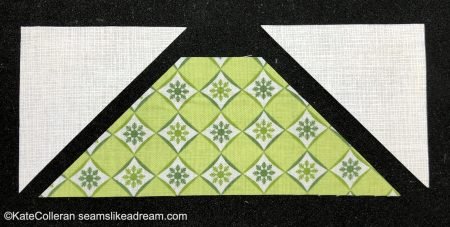
This is a popular technique to make Flying Geese Units! Click here to go to my FG post to see other ways.

Exploring Quilting Basics: How to Do the Stitch and Flip Technique, from top US quilting blog and shop, Seams Like a Dream Quilt Designs.

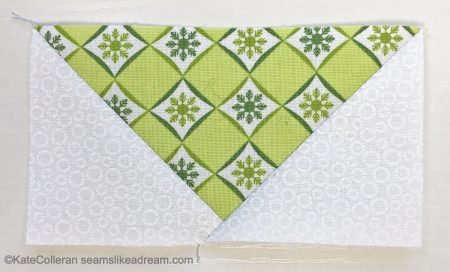
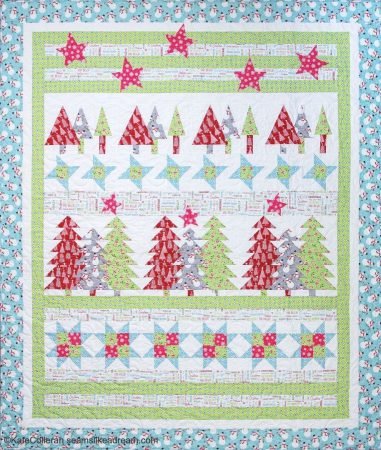
I used this technique for some of the trees in my Forest Nights quilt.

Exploring Quilting Basics: How to Do the Stitch and Flip Technique, from top US quilting blog and shop, Seams Like a Dream Quilt Designs.

Bonus Tip!

It’s really important to double check the rotation of the sewing line! You don’t want to end up with the bottom unit when you want top unit!

So do you have any great tips for making the Stitch and Flip units? I am sure Tammy has some great ideas for us! Click here to head on over to her post to see!


Like this post? Pin it!

How to make a quilt block using the Stitch and Flip technique!

In the next Exploring the Basics post, we will share tips on the square in a square technique! Which includes more stitch and flip!

happy quilting,

Kate

Stitch and Flip
About Kate

About Kate

Hi! I'm Kate Colleran, a designer who creates quilt patterns, fabric and surface designs. I lecture and teach about quilting. Welcome to my online home!

Related Posts

Exploring Quilting Basics: the Snowball Quilt Block

Post navigation

Exploring Quilting Basics: How to Make the Disappearing 4 Patch Block
Exploring Quilting Basics: How to do the Square in a Square Technique.

One comment

  1. Pingback: Square in a Square | Seams Like A Dream Quilt Designs

Leave a Reply Cancel reply

Your email address will not be published. Required fields are marked *

Dreaming In Color

Dreaming In Color

Hi, and welcome to my blog, Dreaming In Color.

There are posts with tips on making quilts, tutorials and information on my newest patterns and designs. Enjoy!

~Kate

Categories

  • A Quilter's Alphabet (22)
  • Block of the Month (27)
  • Blog Hops and Quilt Alongs (264)
  • Exploring Quilting Basics (83)
  • Fabric and Surface Pattern Design (9)
  • Holiday Quilts (32)
  • Quilt Community (176)
  • Quilt Patterns (219)
    • Bags & Small Quilts (71)
    • Braid Projects (20)
    • Braid Quilts (10)
    • Fat Quarter Patterns (21)
    • Jelly Roll Quilt Patterns (5)
    • Precut Quilt Patterns (21)
  • Quilt Projects (77)
  • Quilt Studio Tips (35)
  • Quilt Tutorials (24)
  • Quilting & Sewing Gift Ideas (8)
  • Quilting Essentials (4)
  • Quilting Giveaways (183)
  • Quilting Tips & Tutorials (38)
  • Quilting Tools & Books (72)
  • Reviews (3)
  • Series (7)
  • Testimonials (3)
  • Uncategorized (9)

Search Posts

Sign up for my newsletter and receive a free quilt pattern!

Sign up for my newsletter, Behind the Seams, to keep up to date with news, promotions, giveaways and more!

Enter your email below to get started and get your free quilt pattern!

Thank you!

You have successfully joined our subscriber list.

.

Recent Posts

  • Meet Chalk Hill Blue quilt pattern!
  • The Nordic Stars Quilt Along is open!!
  • Patchwork Braids – adding squares to a braid
  • Patchwork Braids – Braids with varying strip sizes!

Shop ElectricQuilt.com

Check out Craftsy's Free Classes!

Archives

  • Quick Links
  • Wholesale Shop
  • Pattern Updates
  • Privacy Policy
  • Store Policies
  • Contact
Copyright © 2025 | All Rights Reserved | Kate Colleran Designs LLC