Hi friends!
Guess what???? This is the 50th post in the Exploring the Basics blog series! Wow!
That actually means 100 posts- 50 from me and 50 from Tammy!
Yay us!
No time to rest on our laurels… time for the 50th post! In today’s Exploring the Basics post, we are going to explain how to hang a quilt on the wall.
There are many ways to hang a quilt; for my post, I am going to show you how to make a hanging sleeve 2 ways.
Let’s start by chatting about the width of the sleeve. If you are planning to show your quilt at a quilt show, then some shows have a specific request for the sleeve. Be sure to follow their guidelines.
If they just ask for a sleeve, either of these options will work! They should be large enough to handle most hanging poles.
And if you like this technique, there is a link to a PDF at the bottom of the post!
How to Hang a Quilt on the Wall – option 1
A temporary sleeve
This sleeve is hand sewn to your quilt top and therefore easily removed later.
Step 1
Measure across the quilt and cut your hanging sleeve 8 ½” x width of quilt.
Step 2
Fold in the short ends ¼”, press and fold in again ¼”. Topstitch the folded edge about ⅛” away from the fold.

Step 3
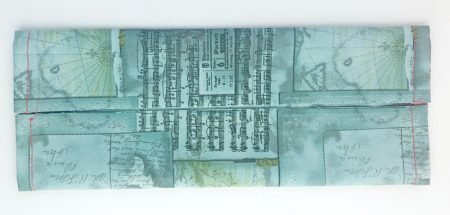
Fold the sleeve in half, wrong sides together. Press a center crease.

Open up the strip, fold the long edges into the center, and press the long sides. You probably will be pressing out the center fold you just made which is perfect; it was there to help as a guide.
Step 4
Open up the sleeve, fold wrong sides together, matching long raw edges and sew the long edge with a ¼” seam. I like to backstitch at both ends of the seam.
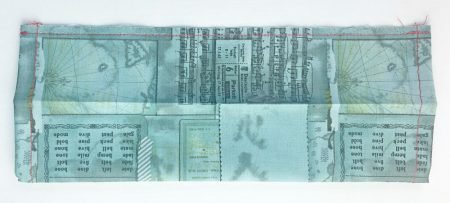
Press the seam open being careful not to press out the long fold lines! A pressing bar can be very helpful. Repress the long fold lines if needed.
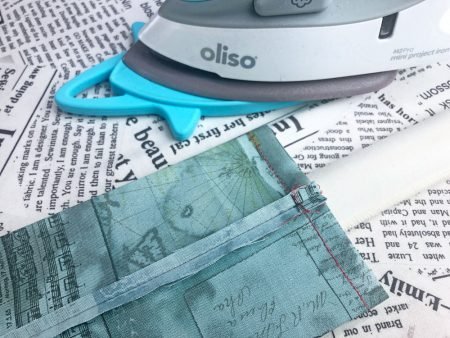
Step 5
Center the sleeve on the back of the quilt, about ½” – ¾” from the top edge and pin sleeve in place using the folds as a guide. The raw edges of the long seam will be against the back of the quilt and not visible.

The top of the sleeve will poof out a bit; this allows the quilt to hang nicely once the hanging rod is inserted. I like to push the poof towards the top of the quilt to check that the sleeve will not be visible once it is hung. If the sleeve shows past the top of the quilt, move it a little lower on the back.
Hand sew the sleeve to the quilt along the long fold lines. Be sure to hand sew the bottom of the short ends of the sleeve to the quilt. This allows easy access for the hanging pole and it won’t touch your quilt.
How to Hang a Quilt on the Wall – option 1
What if you want to add a sleeve and it can be permanent because you plan to always hang this quilt? The sleeve above can be permanent but here is another option.
A permanent sleeve
For this sleeve, you machine sew one side, attaching it to the quilt along with the binding and then only have to hand sew the other sides.
Follow steps 1 and 2 above.
Step 3
Fold the sleeve in half, wrong sides together. Move one long edge down ½”. Press the long folded edge.
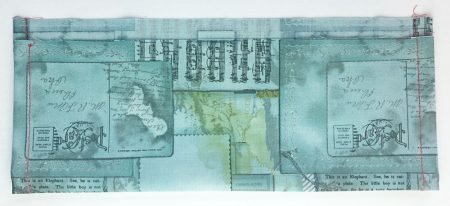
Step 4
Open up the sleeve, fold wrong sides together, matching long raw edges and center along the top of the quilt. The side of the sleeve with excess fabric should be on the outside. The smaller side of the sleeve will be against the quilt.
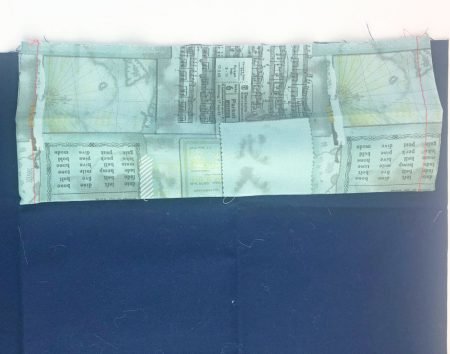
Pin to the back of the quilt. The top of the sleeve will poof out a bit; this allows the quilt to hang nicely once the hanging rod is inserted. I like to push the poof towards the top of the quilt to check that the sleeve will not be visible once it is hung. If the sleeve shows past the top of the quilt, re-press your crease from step 3 and make it a little bit smaller- about ⅜” instead ½”.
Step 5
Attach binding to the front of the quilt, catching the sleeve in the top seam. Hand sew the binding to the back of the quilt and hand sew the long folded edge of the hanging sleeve. Be sure to hand sew the bottom of the short ends of the sleeve to the quilt. This allows easy access for the hanging pole and it won’t touch your quilt.
Note: if you prefer to machine sew both sides of the binding, that method works as well!
If you want the PDF of the 2 methods described above, you can click here to got to my Tips and Tutorials page to get the PDF on How to Hang a Quilt on the Wall!
Small quilts
If you have a smaller quilt and you are hanging it at home, you can make the sleeve smaller to fit your hanging pole. For a small quilt that is hanging on one of my wooden hangers, I only need a sleeve cut to between 5″ to 6″ x width of quilt. What size you need would depend on the diameter of your hanging pole.
Other ways to hang a quilt
There are other ways to hang your quilt; Tammy is exploring some fo them! Click here to go to her blog post to get more ideas!
Like this post? Be sure to Pin It! so you can easily find it again later!
Exploring the Basics
As I mentioned at the top of the post, this is our 50th post in the series. We went all the way through making a quilt from picking the pattern, picking the fabric, to settings, adding borders and binding tips! With so much more in between!
Now Tammy and I are planning to change focus a little with the series. We have started to do posts on blocks- recently blocks that we are playing with in our Instagram series, the Imagination Renovation Challenge! We invited other designers to play along with us and each month we take a basic quilt block and reimagine it. Then, we post images of our in progress blocks and, in the final post we reveal how we changed up the block.
In the past few months we played with the Snowball block, the Pinwheel block, the Rail Fence block, and the Log Cabin block. This month, we are playing with the Churn Dash block! I can’t wait for you to see what I did!

If you are not on Instagram don’t worry. That is why we will be posting at the end of each month about the blocks and you can see what we created. I liked my Pinwheel and Log Cabin blocks so much that I am making them into patterns! Stay tuned for those in a few months.
So for the next couple of months, Exploring the Basics will be 1 x month. If you have any ideas for future posts, things you would like us to cover, please leave a comment on this post or email either one of us! We would love to hear from you!
happy quilting!
Kate
