Skip to content
  • Shop
  • About
  • Portfolio
    • Quilt Patterns
    • Fabric Design
    • Surface Pattern Design
  • Learn
    • Classes
    • Lectures
    • On-Line Classes
    • Tips and Tutorials
    • Quilt Along
  • Blog
  • Contact
  • Shop
  • About
  • Portfolio
    • Quilt Patterns
    • Fabric Design
    • Surface Pattern Design
  • Kate Colleran Designs
  • Learn
    • Classes
    • Lectures
    • On-Line Classes
    • Tips and Tutorials
    • Quilt Along
  • Blog
  • Contact
Exploring Quilting Basics

Exploring Quilting Basics: Binding a Quilt

June 10, 2020April 22, 2021 3 comments

Welcome to our series exploring quilting basics! We left off with some tips on how to choose a quilt design. Next time, we’ll be talking about how to gift your quilts. For an overview of the series, you can check out all of the posts here. 


Hi Friends,

Today in the Exploring the Basics series, Tammy and I are chatting about binding a quilt, be sure to scroll down for my step by step tutorial!

Exploring Quilting Basics: Binding a Quilt, featured by top quilting blog, Seams Like a Dream Quilt Designs, explains some best practices when binding a quilt.

How do you Bind a Quilt?

Do you machine sew it to both sides of the quilt? Do you machine sew to one side and then hand sew on the back? Being ready to bind means your quilt is almost done!

There are many different methods and some of us use a different method depending on the project. For me, since I don’t mind a little hand sewing, my favorite method of binding is to sew the binding to the front of the quilt and then hand sew it down on the back. On the back of the quilt, I use a ladder stitch to secure the binding. It can take a little longer than some other hand stitches but I like the way it looks; you can barely see the stitches!

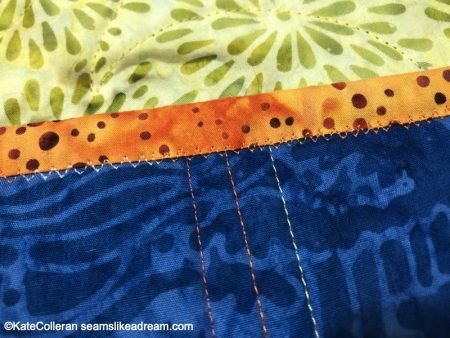
For table runners, placemats and baby quilts, I will often machine stitch down on both sides. These may get washed more often, and for baby quilts, get a little more use, so I machine stitch those. 

Exploring Quilting Basics: Binding a Quilt, featured by top quilting blog, Seams Like a Dream Quilt Designs, explains some best practices when binding a quilt.

Sometimes the second set of stitches on the front is a decorative stitch. Adds a fun touch to the top of the quilt or runner!
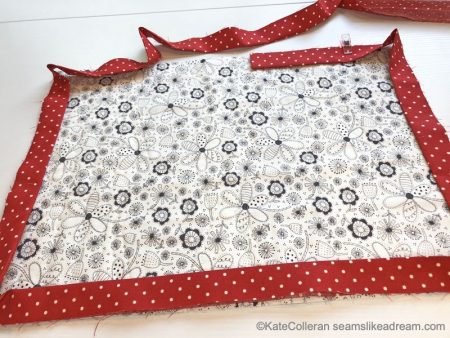
Exploring the Basics: Binding your Quilt, featured on top US quilting blog and shop Seams Like a Dream Quilt Designs!


Binding your Quilt

I make my binding from 2 ¼”  wide strips. I join the strips together with diagonal piecing. I know a lot of people like to use 2 ½” strips and I know of some who like 3″ strips. Use the width binding that works for you!

Exploring Quilting Basics: Binding a Quilt, featured by top quilting blog, Seams Like a Dream Quilt Designs, explains some best practices when binding a quilt.

One thing I do before I sew the binding to the quilt, I lay the binding out all around the sides of the quilt, checking to make sure the seams will not land in a corner. It only takes me about a minutes to test and this way I don’t have to stop and cut my binding partway around the quilt to keep the seams out of the corner.

Exploring Quilting Basics: Binding a Quilt, featured by top quilting blog, Seams Like a Dream Quilt Designs, explains some best practices when binding a quilt.


How to Turn a Corner when Adding the Binding

When attaching the binding to the quilt, one of the areas where we need to be extra careful is turning the corner. Most of us know what to do, but let me show you how I do it.

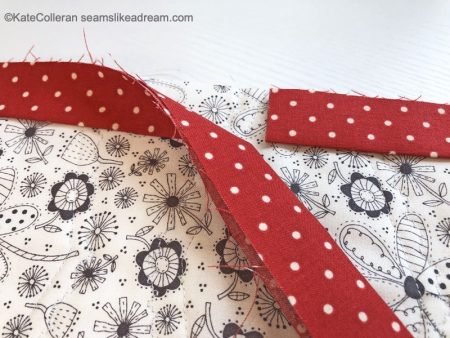
I sew my binding down the side stopping ¼” away from the edge. Then I like to backstitch 1 or 2 stitches. I finish by stitching off the edge at an angle- heading right off the corner of the quilt.

Exploring Quilting Basics: Binding a Quilt, featured by top quilting blog, Seams Like a Dream Quilt Designs, explains some best practices when binding a quilt.

Then, I fold the binding straight up, aligning the edge of the binding with the side edge of the quilt.

Exploring Quilting Basics: Binding a Quilt, featured by top quilting blog, Seams Like a Dream Quilt Designs, explains some best practices when binding a quilt.

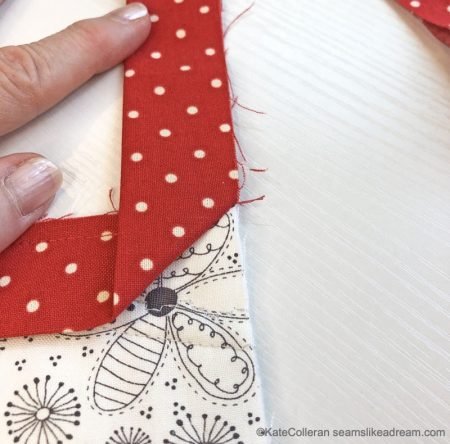
And then fold the binding back down onto itself. 

Exploring Quilting Basics: Binding a Quilt, featured by top quilting blog, Seams Like a Dream Quilt Designs, explains some best practices when binding a quilt.

Here is where I am super careful. I want to make sure the binding does not go past the top edge of the quilt or over the side edge of the quilt. If it does, then the corner won’t look as nice later.

Exploring Quilting Basics: Binding a Quilt, featured by top quilting blog, Seams Like a Dream Quilt Designs, explains some best practices when binding a quilt.

Then I start stitching down the side of the binding. I know some people may start ¼” in from the top edge; I don’t.


How to Connect the Ends when Binding a Quilt

Once I have gone all the way around the quilt, I am ready to connect the ends together. I stop sewing the binding about 6” away from the spot where the 2 ends will overlap. Maybe less if it is a small quilt or a placemat.

Exploring Quilting Basics: Binding a Quilt, featured by top quilting blog, Seams Like a Dream Quilt Designs, explains some best practices when binding a quilt.

Then I lay the beginning of the binding down on the quilt and overlap the end of the binding on top of it. I make a mark on the top piece of binding the width of the binding away from the point where they overlap. 

Exploring Quilting Basics: Binding a Quilt, featured by top quilting blog, Seams Like a Dream Quilt Designs, explains some best practices when binding a quilt.

Actually, I make a mark LESS THAN 2 ¼” away from the point of overlap- I mark at 2 ⅛”. I find that this way I don’t end up with too much binding; a little less binding is easy to ease in but too much makes folds or ripples. 

Some people like to use a small piece of the binding as a guide instead of a ruler, but since my measurement is less than the actual width of the binding, I use a ruler.

Trim the top binding piece at the mark and then open up the ends of each piece of binding. Lay the 2 ends right sides together as a 90 degree angle to each other. Draw a line from corner to corner, sew on the line and trim the seam allowance to ¼”. Refold the binding an finish sewing to the quilt. 

Exploring Quilting Basics: Binding a Quilt, featured by top quilting blog, Seams Like a Dream Quilt Designs, explains some best practices when binding a quilt.

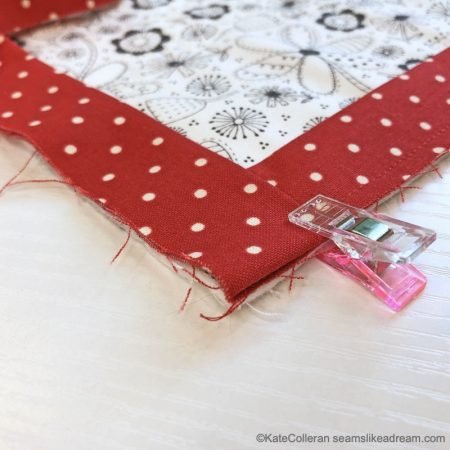
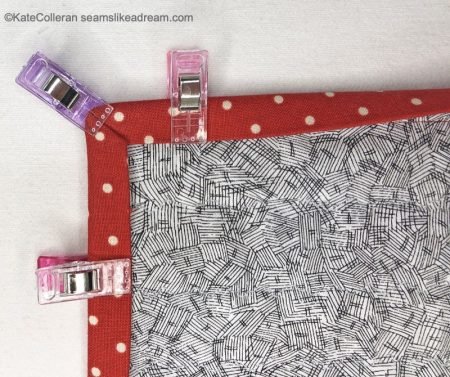
Best Practices Before Stitching the Second Side of your Quilt

Before I fold the binding to the other side of the quilt top, I always press. First I press the binding flat, away from the seam on the side of the quilt that I just sewed.

Exploring Quilting Basics: Binding a Quilt, featured by top quilting blog, Seams Like a Dream Quilt Designs, explains some best practices when binding a quilt.

Then I press the binding to the other side of the quilt, taking the time to press the corner, first flat, then again after folding the corner into a nice miter.

Exploring Quilting Basics: Binding a Quilt, featured by top quilting blog, Seams Like a Dream Quilt Designs, explains some best practices when binding a quilt.

I use binding clips the hold the corners down.

Exploring Quilting Basics: Binding a Quilt, featured by top quilting blog, Seams Like a Dream Quilt Designs, explains some best practices when binding a quilt.

What is your favorite method of binding? Do you machine sew the binding to both sides of the quilt? Leave me a comment- would love to get your tips!

Exploring Quilting Basics: Binding a Quilt, featured by top quilting blog, Seams Like a Dream Quilt Designs, explains some best practices when binding a quilt.

Click here to head on over to Tammy’s post and get her binding tips! I am sure she has some great information for you!

happy quilting!

Kate

If you missed the last Exploring the Basics blog post on quilting, click here.


Sign Up and get a Free Quilt Pattern!

Sign up for my newsletter, Behind the Seams, stay up to date on all my quilty news and offers AND get a free quilt pattern! Let’s get creative!

Click below to get started!


Thank you!

You have successfully joined our email list. Check your inbox for your link to the free pattern!

.


Bindingquilt binding
About Kate

About Kate

Hi! I'm Kate Colleran, a designer who creates quilt patterns, fabric and surface designs. I lecture and teach about quilting. Welcome to my online home!

Related Posts

Quilt Along 2021: Lighthouse Steps Post #5
A Quilter’s Alphabet: B is for Quilt Borders, Batting, Backing and Binding!

Post navigation

Exploring Quilting Basics: How to Choose a Quilt Design for your Next Quilting Project
Exploring Quilting Basics: How to Gift a Quilt

3 comments

  1. Pingback: How to Gift a Quilt | Seams Like A Dream Quilt Designs
  2. Mrs. Plum says:
    June 10, 2020 at 10:16 pm

    Thanks for a great binding tutorial! Recently, I’ve become a big convert to heavily starched fabric, both for my quilt and for the binding. After the binding fabric is starched, I cut bias strips. If it is for a heavily used quilt, I machine sew both sides of the binding. I first sew the binding to the back of the quilt, stretching the bias ever so slightly. The starch only lets it stretch so much. When I sew the front side, I use a decorative stitch, which always seems to stretch the binding a bit. Because I already slightly stretched the binding the first time around, it comes out perfectly without wavy edges. Sounds weird, but it works for me.

    Reply
    1. Kate Colleran says:
      June 11, 2020 at 12:42 pm

      Maryellen,
      I love when people land upon a technique that works for them! I think it is so great to share what works for you so others have an opportunity to try new methods. So thanks for sharing!

      Reply

Leave a Reply Cancel reply

Your email address will not be published. Required fields are marked *

Dreaming In Color

Dreaming In Color

Hi, and welcome to my blog, Dreaming In Color.

There are posts with tips on making quilts, tutorials and information on my newest patterns and designs. Enjoy!

~Kate

Categories

  • A Quilter's Alphabet (22)
  • Block of the Month (27)
  • Blog Hops and Quilt Alongs (263)
  • Exploring Quilting Basics (83)
  • Fabric and Surface Pattern Design (9)
  • Holiday Quilts (32)
  • Quilt Community (176)
  • Quilt Patterns (218)
    • Bags & Small Quilts (71)
    • Braid Projects (20)
    • Braid Quilts (10)
    • Fat Quarter Patterns (21)
    • Jelly Roll Quilt Patterns (5)
    • Precut Quilt Patterns (21)
  • Quilt Projects (77)
  • Quilt Studio Tips (35)
  • Quilt Tutorials (24)
  • Quilting & Sewing Gift Ideas (8)
  • Quilting Essentials (4)
  • Quilting Giveaways (183)
  • Quilting Tips & Tutorials (38)
  • Quilting Tools & Books (72)
  • Reviews (3)
  • Series (7)
  • Testimonials (3)
  • Uncategorized (9)

Search Posts

Sign up for my newsletter and receive a free quilt pattern!

Sign up for my newsletter, Behind the Seams, to keep up to date with news, promotions, giveaways and more!

Enter your email below to get started and get your free quilt pattern!

Thank you!

You have successfully joined our subscriber list.

.

Recent Posts

  • Patchwork Braids – adding squares to a braid
  • Patchwork Braids – Braids with varying strip sizes!
  • Patchwork Braids – Bluebell placemat
  • Just Dandy- a new batik line and a fabric giveaway!

Shop ElectricQuilt.com

Check out Craftsy's Free Classes!

Archives

  • Quick Links
  • Wholesale Shop
  • Pattern Updates
  • Privacy Policy
  • Store Policies
  • Contact
Copyright © 2025 | All Rights Reserved | Kate Colleran Designs LLC