Skip to content
  • Shop
  • About
  • Portfolio
    • Quilt Patterns
    • Fabric Design
    • Surface Pattern Design
  • Learn
    • Classes
    • Lectures
    • On-Line Classes
    • Tips and Tutorials
    • Quilt Along
  • Blog
  • Contact
  • Shop
  • About
  • Portfolio
    • Quilt Patterns
    • Fabric Design
    • Surface Pattern Design
  • Kate Colleran Designs
  • Learn
    • Classes
    • Lectures
    • On-Line Classes
    • Tips and Tutorials
    • Quilt Along
  • Blog
  • Contact
Exploring Quilting Basics

Exploring Quilting Basics: The Half Rectangle Triangle Block

December 9, 2020January 27, 2021 1 comment

Welcome to our series exploring quilting basics! Previously, we looked at ways to quilt diamond in a rectangle blocks. Coming up next in our basics lineup are peaky and spike blocks. Or if you would like to start from the beginning and work through all the topics, you can find them all here. 


Hi friends!

Today in the Exploring the Basics blog series, Tammy and I are chatting about the Half Rectangle Triangle. This is another one of those units with many names. Some call it half long triangles, half rec, split rec…. so many names!

Let’s explore a few ways to make the unit.

Traditional Piecing the Half Rectangle Triangle

To make this block, you can cut 2 rectangles, layer them together with both rectangles rights sides up and cut corner to corner along the diagonal line.

Exploring Quilting Basics featured by top US quilting blog and shop Seams Like a Dream Quilt Designs, shows how to make half rectangle triangle blocks!

Layer the cut triangles right sides together and offset the points by ¼”. Sew them together, press and trim to size.

Exploring Quilting Basics featured by top US quilting blog and shop Seams Like a Dream Quilt Designs, shows how to make half rectangle triangle blocks!

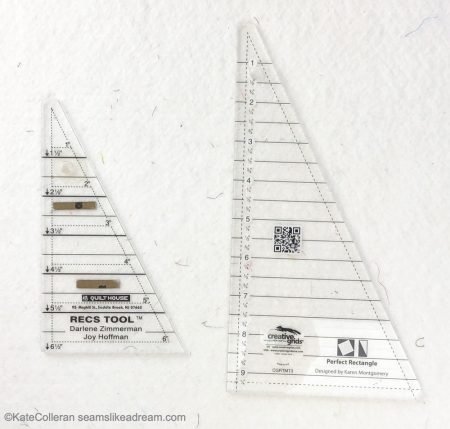
You can also cut the same triangles using a triangle ruler, such at the Triangle Recs tool or the Creative Grids Perfect Rectangle rulers. That way you don’t have to wonder how much to offset, just line up the angled cuts!

Making 2 at Once!

In this next method, it makes 2 blocks at once! Who doesn’t love to save a little time! First a little quilt math.

Quilt Math

The math for these is to determine how big you want your finished rectangles to be. Often, they are a 1:2 ratio so if the block is 3″ wide it will be 6″ long.

Once you know the finished size, add 1″ to the short side and 2″ to the long side. For a 3″ x 6″ finished rectangle, I would cut a rectangle 4″ x 8″.

Now….. I like a little wiggle room so I would probably add another ¼” and cut them 4 ¼” x 8 ¼”.

Exploring Quilting Basics featured by top US quilting blog and shop Seams Like a Dream Quilt Designs, shows how to make half rectangle triangle blocks!

To keep all the quilt math in one place, the other size you need to know is what size to trim the units. That is the finished size plus ½” so for my 3″ x 6″ rectangles, after sewing I would trim to 3 ½”  x 6 ½”. More on trimming below.

Marking and Sewing 

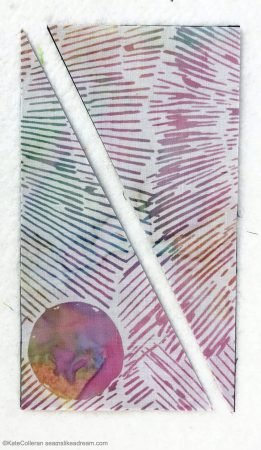
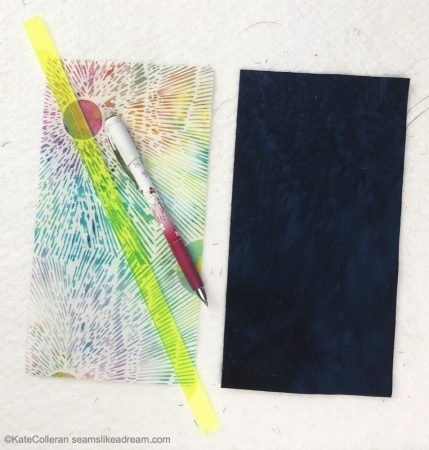
Mark a diagonal line corner to corner on the lighter rectangle. Or, if you are like me and like to make the sewing lines, mark 2 sewing lines ¼” away from the diagonal line. Just like you would do for a HST unit!

Exploring Quilting Basics featured by top US quilting blog and shop Seams Like a Dream Quilt Designs, shows how to make half rectangle triangle blocks!

Here is a tricky part; position the rectangles right sides together with the top rectangle at an angle to the bottom rectangle. If you drew your line(s) from top left to bottom right, it would look like this.

Exploring Quilting Basics featured by top US quilting blog and shop Seams Like a Dream Quilt Designs, shows how to make half rectangle triangle blocks!

If you drew your line(s) top right to bottom left, it would look like this.

Exploring Quilting Basics featured by top US quilting blog and shop Seams Like a Dream Quilt Designs, shows how to make half rectangle triangle blocks!

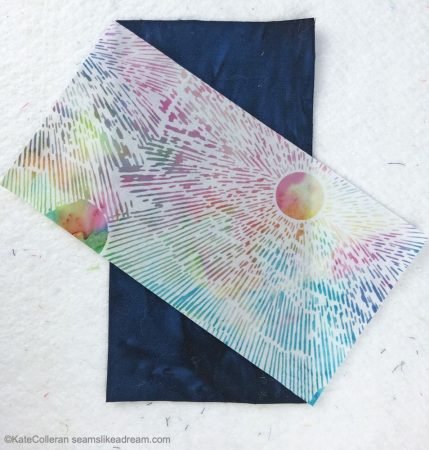
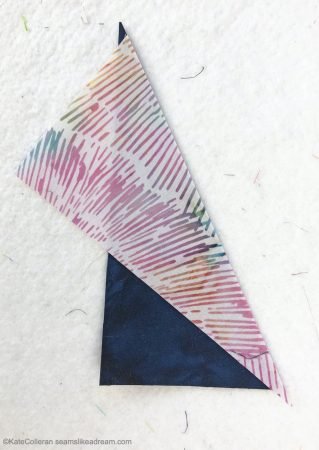
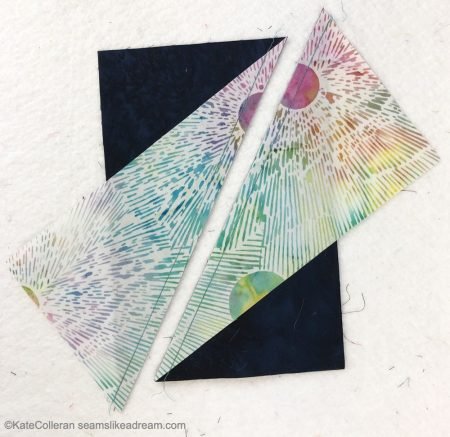
Sew  ¼” from the diagonal line on both sides and cut along the diagonal line. Press the seam open or to one side.

Exploring Quilting Basics featured by top US quilting blog and shop Seams Like a Dream Quilt Designs, shows how to make half rectangle triangle blocks!

Trimming

This is another tricky part but once you get the hang to it, it’s not hard!

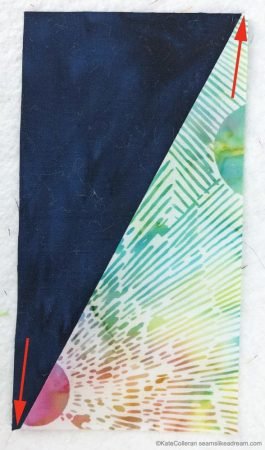
I need to trim my rectangle to 3 ½”  x 6 ½”. To give you an idea of how big these are starting at, I oversized my pieces by ½”. (A little much, but easier to show the trimming.)

Trim so that the corner points are ⅛” in from the corner- NOT right in the corner. While there are some specialty rulers for trimming that are helpful, I don’t have one. Though, if I was making a bunch of these, I would probably get one, maybe the Bloc_Loc one.

Place your ruler so the lines for the 3 ½” and 6 ½” are ⅛” away from the diagonal seam.

Exploring Quilting Basics featured by top US quilting blog and shop Seams Like a Dream Quilt Designs, shows how to make half rectangle triangle blocks!

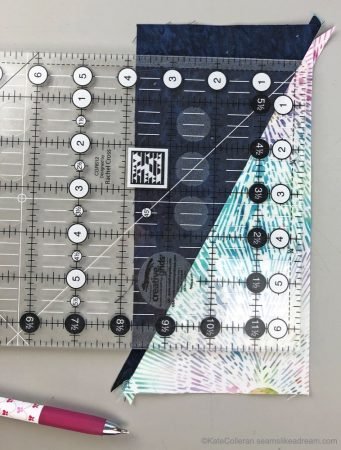
Here is a close up of the bottom corner of the ruler. See where I drew the tiny white line? That was just to show the ⅛”.

Exploring Quilting Basics featured by top US quilting blog and shop Seams Like a Dream Quilt Designs, shows how to make half rectangle triangle blocks!

Offset at the top corner.

Exploring Quilting Basics featured by top US quilting blog and shop Seams Like a Dream Quilt Designs, shows how to make half rectangle triangle blocks!

My ruler is 6 ½” wide so it makes easy to trim 3 sides at once but for a smaller unit, I would trim 2 sides.

Exploring Quilting Basics featured by top US quilting blog and shop Seams Like a Dream Quilt Designs, shows how to make half rectangle triangle blocks!

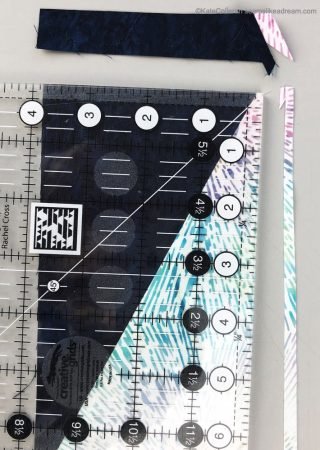
Then rotate the unit, line up the lines for the correct size and trim the other 2 sides.

Exploring Quilting Basics featured by top US quilting blog and shop Seams Like a Dream Quilt Designs, shows how to make half rectangle triangle blocks!

The trick is lining up the ruler for the first cut. I had to move it around until I found the spot so that I was ⅛” away at both corners!

Wouldn’t these make great star points?

Exploring Quilting Basics featured by top US quilting blog and shop Seams Like a Dream Quilt Designs, shows how to make half rectangle triangle blocks!

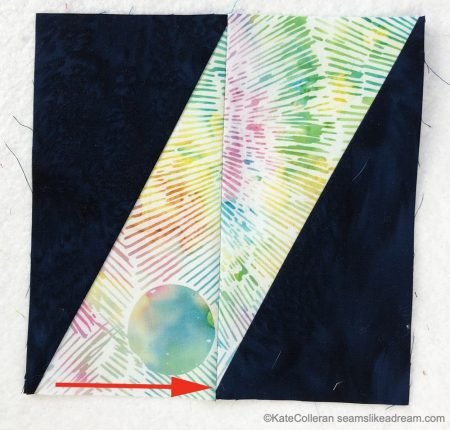
Below are 2 rectangles sewn together- see how by offsetting the point at the corners my points will be right at the  ¼” when all sewn together? I won’t lose my points!

Exploring Quilting Basics featured by top US quilting blog and shop Seams Like a Dream Quilt Designs, shows how to make half rectangle triangle blocks!

Click here to head over to Tammy’s post and see how she uses the Studio 180 ruler to make her half rectangle triangle units- or as they call them, split rec blocks!

happy quilting!

Kate

I update an earlier post on organizing my quilt studio with a link to another great blog post! Click here to see the updated post and then head over the other blog. I think you will like all of Ali’s ideas!

Half rectangle trianglequilt tutorial
About Kate

About Kate

Hi! I'm Kate Colleran, a designer who creates quilt patterns, fabric and surface designs. I lecture and teach about quilting. Welcome to my online home!

Related Posts

A Quilter’s Alphabet: J and K as in Jelly Roll, and Knife Edge Finish
Exploring the Basics: How to Make a Shaded Nine Patch Quilt Block

Post navigation

Exploring Quilting Basics – The Diamond in a Rectangle Quilt Block
Exploring Quilting Basics: the Peaky And Spike Block

One comment

  1. Pingback: Peaky and Spike block | Seams Like A Dream Quilt Designs

Leave a Reply Cancel reply

Your email address will not be published. Required fields are marked *

Dreaming In Color

Dreaming In Color

Hi, and welcome to my blog, Dreaming In Color.

There are posts with tips on making quilts, tutorials and information on my newest patterns and designs. Enjoy!

~Kate

Categories

  • A Quilter's Alphabet (22)
  • Block of the Month (27)
  • Blog Hops and Quilt Alongs (264)
  • Exploring Quilting Basics (83)
  • Fabric and Surface Pattern Design (9)
  • Holiday Quilts (32)
  • Quilt Community (176)
  • Quilt Patterns (219)
    • Bags & Small Quilts (71)
    • Braid Projects (20)
    • Braid Quilts (10)
    • Fat Quarter Patterns (21)
    • Jelly Roll Quilt Patterns (5)
    • Precut Quilt Patterns (21)
  • Quilt Projects (77)
  • Quilt Studio Tips (35)
  • Quilt Tutorials (24)
  • Quilting & Sewing Gift Ideas (8)
  • Quilting Essentials (4)
  • Quilting Giveaways (183)
  • Quilting Tips & Tutorials (38)
  • Quilting Tools & Books (73)
  • Reviews (3)
  • Series (7)
  • Testimonials (3)
  • Uncategorized (9)

Search Posts

Sign up for my newsletter and receive a free quilt pattern!

Sign up for my newsletter, Behind the Seams, to keep up to date with news, promotions, giveaways and more!

Enter your email below to get started and get your free quilt pattern!

Thank you!

You have successfully joined our subscriber list.

.

Recent Posts

  • Patchwork Braids – Using pieced strips in a braid
  • Meet Chalk Hill Blue quilt pattern!
  • The Nordic Stars Quilt Along is open!!
  • Patchwork Braids – adding squares to a braid

Shop ElectricQuilt.com

Check out Craftsy's Free Classes!

Archives

  • Quick Links
  • Wholesale Shop
  • Pattern Updates
  • Privacy Policy
  • Store Policies
  • Contact
Copyright © 2025 | All Rights Reserved | Kate Colleran Designs LLC