Skip to content
  • Shop
  • About
  • Portfolio
    • Quilt Patterns
    • Fabric Design
    • Surface Pattern Design
  • Learn
    • Classes
    • Lectures
    • On-Line Classes
    • Tips and Tutorials
    • Quilt Along
  • Blog
  • Contact
  • Shop
  • About
  • Portfolio
    • Quilt Patterns
    • Fabric Design
    • Surface Pattern Design
  • Kate Colleran Designs
  • Learn
    • Classes
    • Lectures
    • On-Line Classes
    • Tips and Tutorials
    • Quilt Along
  • Blog
  • Contact
Quilting Tips & Tutorials

Quilting Tips: 5 Essential Tips for Sewing Curves

January 15, 2021January 15, 2021 2 comments

Hi friends!

Today I want to talk about sewing curves. Are you curve phobic? I have to admit, I was afraid of sewing curves for quite a while! Then I designed a quilt for the 2019 Quilter’s Planner that had curves in it and it was time for me to get over my hesitation.

Top US quilting blog and shop, Seams Like a Dream Quilt Designs, shares tips for sewing curved quilt blocks.
Drinking in the Sunshine quilt on the beach. Photo by Kitty Wilkin of @nightquilter

To be honest it took several tries before I found a method I really liked. Here are my top tips for sewing curves!

Tip #1

Don’t stretch the fabric! Curves are bias and fabric cut on the bias stretches very easily!

Top US quilting blog and shop, Seams Like a Dream Quilt Designs, shares tips for sewing curved quilt blocks.

And I don’t know about you, but when I am nervous about sewing something, I hang on to the fabric rather tightly to control things while I sew.  But when sewing curves, that makes it very easy to stretch the fabric! So relax, hold lightly onto the fabric and sew.

Tip #2

To help with #1, hold the fabric with tweezers as you sew.

Top US quilting blog and shop, Seams Like a Dream Quilt Designs, shares tips for sewing curved quilt blocks.

And if you have long tweezers, the kind that usually comes with a serger, these are the best.

Tip #3

There are many videos out there on different ways to sew drunkard’s path block. Watch a lot of them to find your favorite method! There are options to sew using lots of pins, with different pieces on top, glueing the pieces together….

Top US quilting blog and shop, Seams Like a Dream Quilt Designs, shares tips for sewing curved quilt blocks.

Then, try 2 or 3 different methods- and try each method more than once. Really! Grab your scraps, cut some pieces and try each method. Usually the first time you try, it doesn’t go well; to be expected.

Then try it again a couple of times and see how it feels. Then try another method and see how that one feels.

Tip #4

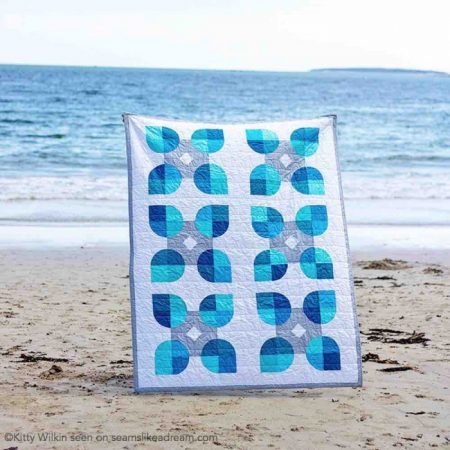
You don’t have to press all the pieces in one direction. When I am sewing together blocks with curves, I press the seams of some to the concave piece and some to the convex piece.

Top US quilting blog and shop, Seams Like a Dream Quilt Designs, shares tips for sewing curved quilt blocks.

That way the seams nest together nicely and things line up easier.

I used this pressing for my Tropical Moon quilt.

Do you forget which is the concave piece and which is the convex piece?

Top US quilting blog and shop, Seams Like a Dream Quilt Designs, shares tips for sewing curved quilt blocks.

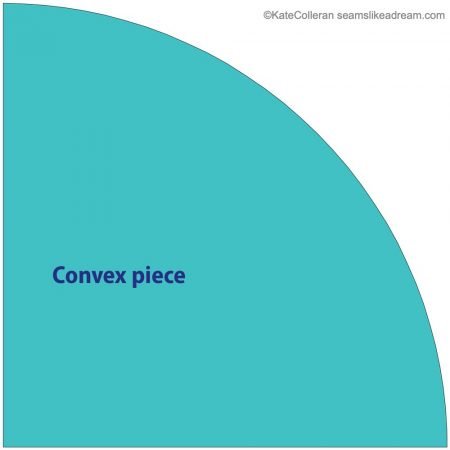
For some reason, those terms were hard for me to remember until I read something which said the concave piece looks like you are going into a cave.

Top US quilting blog and shop, Seams Like a Dream Quilt Designs, shares tips for sewing curved quilt blocks.

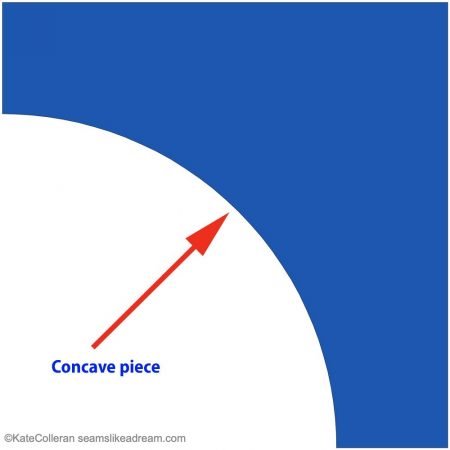
Thinking about a cave really helped me remember. I got it now!

Tip #5

Try my favorite method: I call it the one pin method! Originally it was the 2 pin method but once I got good at it, one pin was enough. But I will show you the 2 pins to start…

The One or Two Pin method

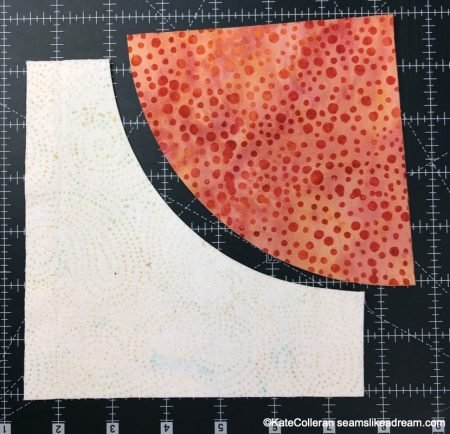
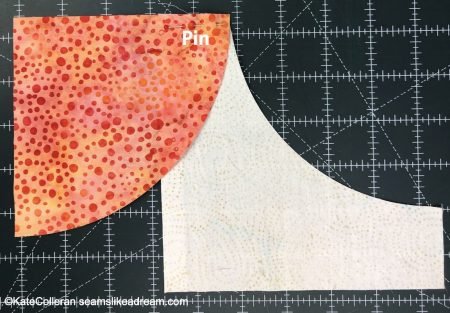
Start with your 2 pieces right sides together with the convex piece on top.

Here are my 2 pieces of fabric, RST, with the convex piece on top.

Pin the 2 together at one end.

Top US quilting blog and shop, Seams Like a Dream Quilt Designs, shares tips for sewing curved quilt blocks.

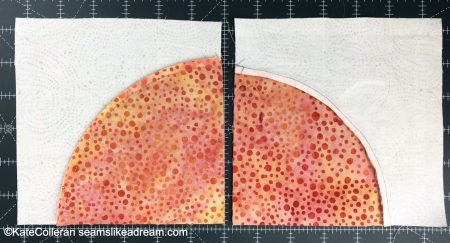
Now line up the end and pin the other end.

Top US quilting blog and shop, Seams Like a Dream Quilt Designs, shares tips for sewing curved quilt blocks.

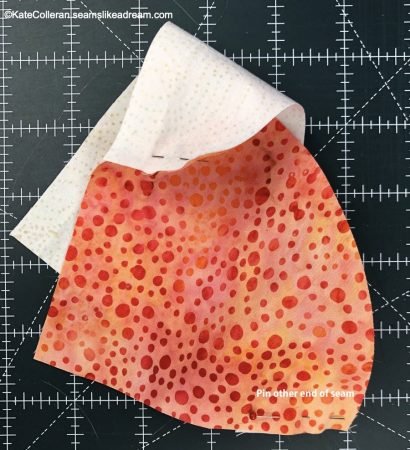
Once you have the 2 ends pinned, sew the seam using the tweezers to gently guide and hold the top piece and using your left hand to smooth the wrinkles away from the seam in the underneath piece.

Top US quilting blog and shop, Seams Like a Dream Quilt Designs, shares tips for sewing curved quilt blocks.

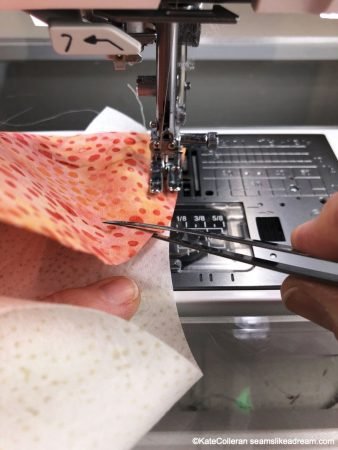
I sew very slowly, stopping when needed with the needle in the down position so I can GENTLY adjust the fabric as needed.

Once you get good, skip the first pin!

Click here to see a short video on my favorite sewing method. I hope to have a video on how to cut using my Drunkard’s Path Templates Set 1 very soon!

Next week in the Exploring Quilting Basics series, Tammy and I will be chatting about the Partial Quarter Square Triangle block!

happy quilting!

Kate

curved piecingDrunkard's Path block
About Kate

About Kate

Hi! I'm Kate Colleran, a designer who creates quilt patterns, fabric and surface designs. I lecture and teach about quilting. Welcome to my online home!

Related Posts

Quilting Blog Hop: Tiki Punch Fabric Line and Small Projects
June Island Batik Challenge

Post navigation

Trying Something New: Improv Quilting
Color Confidence for Quilters: Choosing colors for your next quilt

2 comments

  1. Fran Sakelarides says:
    January 18, 2021 at 3:07 pm

    Love your tropical moon quilt. I use the “ cave” hint too.
    If I could add one tip it would be to oversize and trim to fit.
    I recently made a bunch that were not cut quite right but I started sewing at the center point and stitched to one end then turned them over and stitched to the other end. Then I trimmed them down to fit what I needed. I could not decide if I preferred to stitch with the concave or convex on top. Happy quilting!

    Reply
    1. Kate Colleran says:
      January 19, 2021 at 9:03 am

      Fran,
      Trimming to size is another great tip! I cut the square for the concave piece larger and only trim that one down.
      It’s funny trying to find the method that feels the best- I thought it was going to be the method with more pins with the concave on top so I could see the wrinkles to smooth them out but for me, the opposite works best!
      Thanks for sharing your tip!

      Reply

Leave a Reply Cancel reply

Your email address will not be published. Required fields are marked *

Dreaming In Color

Dreaming In Color

Hi, and welcome to my blog, Dreaming In Color.

There are posts with tips on making quilts, tutorials and information on my newest patterns and designs. Enjoy!

~Kate

Categories

  • A Quilter's Alphabet (22)
  • Block of the Month (28)
  • Blog Hops and Quilt Alongs (265)
  • Exploring Quilting Basics (83)
  • Fabric and Surface Pattern Design (10)
  • Holiday Quilts (32)
  • Quilt Community (176)
  • Quilt Patterns (219)
    • Bags & Small Quilts (71)
    • Braid Projects (20)
    • Braid Quilts (10)
    • Fat Quarter Patterns (21)
    • Jelly Roll Quilt Patterns (5)
    • Precut Quilt Patterns (21)
  • Quilt Projects (77)
  • Quilt Studio Tips (35)
  • Quilt Tutorials (24)
  • Quilting & Sewing Gift Ideas (8)
  • Quilting Essentials (4)
  • Quilting Giveaways (187)
  • Quilting Tips & Tutorials (38)
  • Quilting Tools & Books (73)
  • Reviews (3)
  • Series (7)
  • Testimonials (3)
  • Uncategorized (9)

Search Posts

Sign up for my newsletter and receive a free quilt pattern!

Sign up for my newsletter, Behind the Seams, to keep up to date with news, promotions, giveaways and more!

Enter your email below to get started and get your free quilt pattern!

Thank you!

You have successfully joined our subscriber list.

.

Recent Posts

  • Christmas in July- the last post.
  • Jingle Bell Pines Block Party Block 1 Santa’s Hat!
  • Christmas in July- another fabric giveaway post!!
  • Chalk Hill Blue Fabric Giveaway!
Check out Craftsy's Free Classes!

Archives

  • Quick Links
  • Wholesale Shop
  • Pattern Updates
  • Privacy Policy
  • Store Policies
  • Contact
Copyright © 2025 | All Rights Reserved | Kate Colleran Designs LLC