Hi friends!
Welcome back for Week 4 of the Lighthouse Steps Quilt Along!
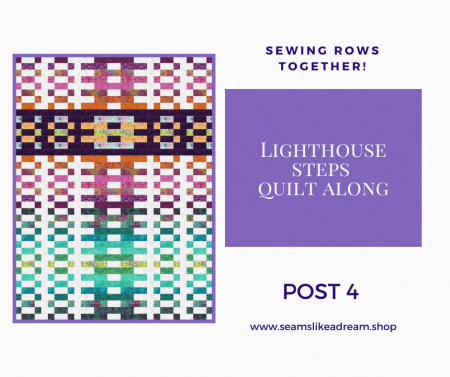
How did you do sewing your rows? Are you ready to sew them together?? I have just a few tips for you.
If you have missed any of the posts for the Quilt Along, click for the Introduction post, for Post 1, Post 2 and Post 3!
Tip #1 – Pressing your rows
Make sure you have pressed your rows flat and that the seams are pressed consistently to one side. If your rows feel a little wavy, try pressing flat with a fine mist of Best Press or Flatter.

I mean a fine mist. We are working with precuts so the fabrics are not pre-washed and too much moisture can affect them and make them shrink a bit. And that can make them pretty easy to stretch out of shape if you really iron. So press flat. Gently.
Tip #2 -Pin the intersections.
Now this may seem like a “Of course” I am pinning!” moment, but it is easy to decide to just start sewing and figure it will all work out! Ask me how I know this.
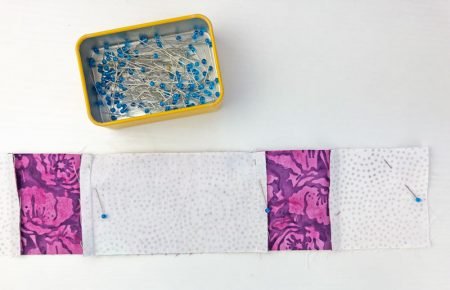
I am not big into pinning. When possible, if I think I can match seams by just holding the fabrics together with my fingers as I come up to each seam, I am likely to do that.
For this quilt, my rows worked out better when I pinned most of the intersections.
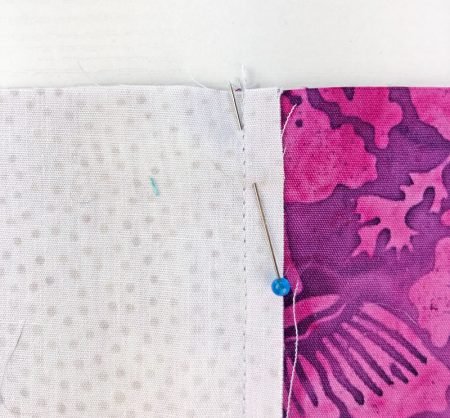
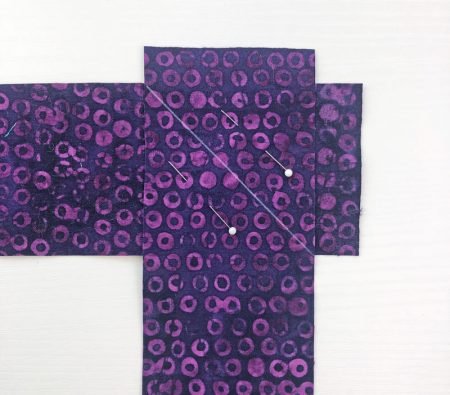
How I like to pin
First let me show you how I pin. My pins are not going across the seam with the ball of the pin outside and to the right and the point of the pin heading into the row.
I pin with all of my pin in the row, with the pin starting away from the seam and inserted at a 45 degree angle.
This way, when I am sewing, I can easily nudge the pin away from the seam with my left hand.

And if I get sewing a little fast and forget to move the pin, I would only sew over the tip- the smallest part of the pin. I am less likely to break a needle.
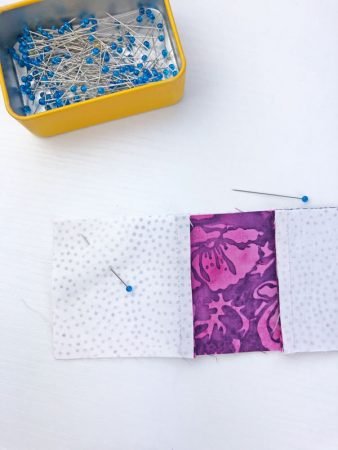
Intersections to pin
As you place your rows together to sew you will have 2 intersections to deal with; one where the top seam is going away from you.
The second one has the top seam is heading towards you.

As you sew, most of our machines feed the fabric from the bottom, but the presser foot just puts pressure on the top fabric. Which means it kind of pushes the top fabric towards you as your sew.
(If you have a Pfaff or other machine with the IDT or an even feed foot, then this is less of an issue.)
So while the machine will help to nest the seams with the top seam heading away from you by pushing it into the bottom seam, it will help to pull the other seam away from the bottom seam.
I suggest pinning both types of intersection, but it is really important to pin the one where the top seam is heading towards you as you sew.
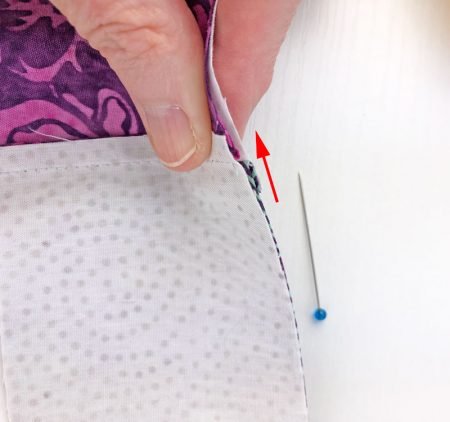
To pin the intersections, I put the pin in the fabric on the right side of the seam and have the pin come out on the left side of the seam. This helps hold those 2 together and makes it less likely they will pull apart as I sew.
I also pin the start of the row and the end of the row. Then as I sew, I stop frequently with my needle in the down position and smooth any bumps away from me.
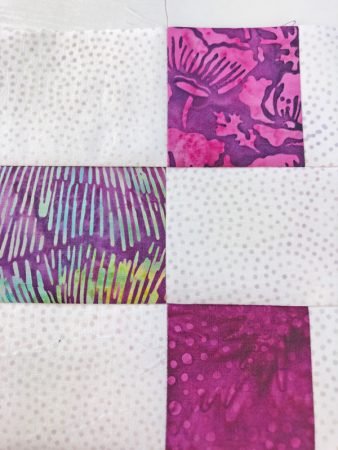
Tips # 3 -Organizing your sewing
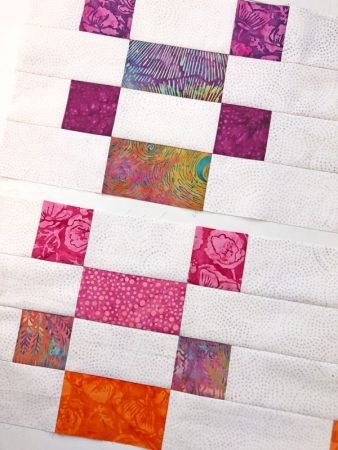
One other thing I like to do when sewing the rows together is to stay organized! I am less likely to sew my rows in the wrong order (though it had been known to happen) if I sew in chunks.
I like to start with the top sections and sew the first 2 rows together. Then I press the seam to one side.
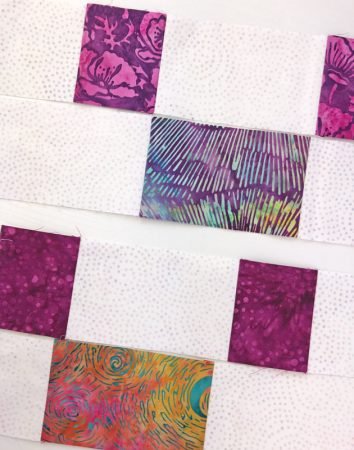
Then I sew the next 2 rows together and press. I then sew the 2 sets of 2 rows together. After that, I move on to the next set of rows.
I sew the top section together and set it aside.
Then I sew the center section and add the 2 contrasting strips to the top and bottom of the section.
Next I sew the top and center sections together and move onto sewing the bottom section. I sew that one in groups, sew the groups together and then sew the bottom section to the rest of the quilt. Ta-done!
Remember to keep your photographs of each section nearby so you can refer to them and keep your rows in order! The rows have a tendency to play around and next thing you know… they are in the wrong order!
Sewing the Contrast Strips
Here are a few tips when making and adding the contrast strips to the center section.
First, sew the strips together with a diagonal seam.
Trim the excess away and press the seam open. That way, the join is less noticeable.
Second, once you have cut the strips to size, find the center of the strip and then the center of the quilt center section and mark each with a pin. Match up the center pins, and then pin the beginning of the seam and the end of the seam.

Continue to pin the seam between the pins, smoothing any excess along the seam. Sew them together and press to the contrast strip!
Bonus Tip
One note about sewing the rows together. Most of the time in quilting, we don’t use a backstitch at the beginning and end of a seam. That’s because when you add the next fabric, you sew over the seam, locking it down.
With the lap size quilt, you are not adding borders. So all the seams will not get locked down. You can either backstitch at the beginning and end of each seam or, once the top is done, sew all the way around the outside edge of the quilt top, about ⅛” in from the edge to secure the seams. You don’t want them to pull open during quilting!
A new Quilt Along Giveaway!!!
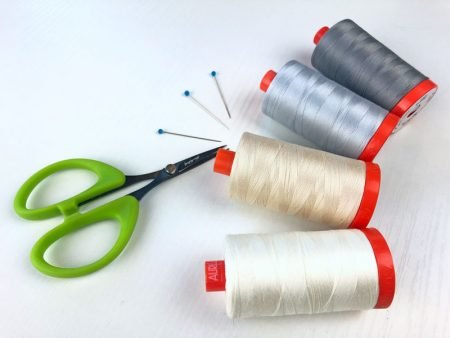
How about another giveaway? Last week, Schmetz Needles gave me some needle packs to give away. This week Aurifil Thread is offering some of their 50 wt thread!
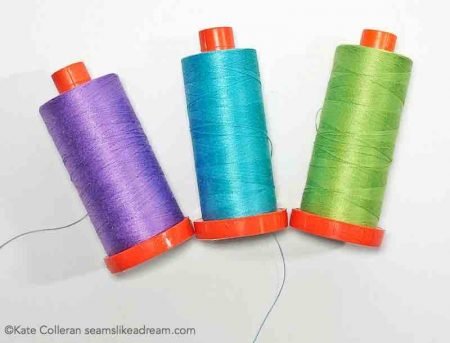
I love using Aurifil thread. It is strong yet thin, lays flat in my seams and produces less lint than some other threads. And it comes in so many fun colors! For piecing though, I usually stick to a neutral color- my to go threads are grey and beige.
Giveaway is closed and I have emailed the winner! Thanks to everyone who entered and I love all your comments!
To enter, just leave me a comment on this post– you could tell me whether you are someone who pins a lot or little- curious minds want to know! But any comment will do!
Giveaway is open until midnight Monday March 29th – mountain time!
The last blog post in the Quilt Along is Friday April 9th. In that post, I will share some ideas on quilting as well as border and binding tips! See you then!
And yes, I will have one last giveaway on that blog post! I was going to do a Zoom call, but my schedule changed so it will just be a blog post.
Have fun sewing your quilt top together!
Happy quilting,
Kate
P.S. I have only 1 Strip pack left of the Painted Blossoms fabrics! So if you are interested, click here to go to my shop!

Loved all your tips and clear photos. I do pin intersecting seams. Your blog and website are fabulous.
Thank you –
D
I use pins most every seam that is in a length of more that 5″ and sometime use many pins to keep it nice and straight.
Thank you for all the tips. I appreciate it. Enjoy your day. angielovesgary2 atgmail dotcom 🌻🌷
Great tips; can I add mine? Purchase good quality pins; they last much longer, usually much sharper for longer, the “flat head” ones are thinner and easier to sew over and you can iron over them and they don’t melt. If they do get a little “difficult” to push through the fabric; run them (carefully) through you hair and the bit of oil from your hair will help push them through.
I do like to pin the middle and ends when I am adding the borders. Aurifil is my favorite thread.
I use as few pins as possible–also started using more wonder clips!
It depends on what I’m sewing, but I generally use a lot of pins.
Thanks for the opportunity to win!
I can be a bit of a perfectionist with sewing and pieceing so I always pin everything! Not only does it hold the pieces together so that the results are good but it also give me confidence that I will be happy with the results 🙂 Thank you for the tips!
I do not pin a lot, just after I have had to take it out a few times! I love the Aurifil threat though. It’s thin and doesn’t leave a bunch of fuzzies in my machine.
Thanks for this tutorial on how to pin. Love it!
Great tips on pinning. I do pin when piecing but not neatly. I usually just stick the pin in without much thought. Will try to be more precise in the future when pinning. Love the colors of this quilt and of the Aurifil thread.
I am a pinned. I am interested in your pinning techniques. I will give them a try.
I seldom pin when I am piecing. At those times when I need to pin, I hope I will remember to try your helpful tips!
I do pin a lot! Thanks for the tip about placing the seam towards you to let the sewing machine better nestle the seams! I always wondered about that’
I am becoming more of a pinner. I have used clips a lot, but have recently returned to more pins to hold the fabrics closer to when the needle will secure it.
I usually pin the rows since it helps match them better.
I pin to the minimum. and it usually works good. Aurifil is the best and it does make a didderence. Thanks.
I will pin when I am doing a curve, long border, or a seam that is a little short, but usually, in piecing, I rarely use pins.
Aurifil’s the best! It helps to sew those perfect 1/4″ seams, as it’s fine and doesn’t take up much room with the turn of the seam. I typically use one color for everything, a light taupe. But look at these beautiful colors!
Very good tips!
I match/nest my seams at the intersections & then pin to keep in place. I’m going to read your hint on pinning at 45 degree angle b/c I’ve never heard of that.
I am not a huge pin fanatic, but I will pin at seam intersections. I truly enjoyed reading how you pin at 45 degree angles, and will try this! Thank you for your blog and patterns!
I pin at seam intersections but otherwise I don’t pin frequently. I bought my first spool of Aurifil thread. I have an allergy to knitting with cotton yarn and FMQ with the cotton thread I find at JoAnn’s. I would like to use cotton so I hope I can use it for FMQ.
I pin at seams but I will now pin at an angle across the intersection! Thanks for the tip.
I am glad to see that you pin in the same direction that I do!… I however don’t pin on an angle so I guess that I will have to try that. Would be very nice to win some Aurifil thread
I pin my seams a lot to get everything to match. on long seams I pin less. I think i pin more now than when I started quilting.
I like to pin when matching seams.
The only time I pin is when I am adding borders. When I am piecing blocks I nest the seams.
I always pin seams and intersections. It keeps everything nice and neat.
It depends on what I’m piecing sometimes I can get away with not pinning at all and other blocks like the millers daughter block needs a ton of pins.
Love the beautiful threads
i like to “spin” my seams whenever i can and then pin and sew. for piecing, i use light grey, beige. or white. thanks for the chance to win.
I am definitely a pinner, it certainly has helped me keep my pieces on the straight.
I pin at seam intersections, long seams, and at the beginning and ending of seams.
The explanations are very clear. Thanks!
I use pins minimally. Some things just sew better with the help of a pin but I’m all about what I can do quickly with accuracy.
I pin a lot! if I don’t pin my seams do not line up!
I am a pinner when I want my intersections to match. If the seams nest I usually take my chances. I should probably pin more often.
I’ve gotten to the point where I rarely pin.
Thanks for the reminders on the importance of pinning! I love Aurifil threads and appreciate the chance to win a few for my quilting since I just retired and funds are fixed so to speak.
I pin about every six inches but more importantly careful pressing takes care of a lot of sewing errors.
Yes I pin a fair amount 6-8 inches apart. To me pinning is good at top bottom and a few in between and definitely close to intersections.
I generally always pin, if I don’t I’m usually sorry
I pin about every 6 inches of so , if I pinned more my seams would be straighter and more precise.
Thank you so much for pinning tips. I’ve been a quilter for a long time and the way you pin the intersection that is facing you is fantastic. I can’t wait to
give it a try.
I wonder if you are left-handed, Kate? I’m not and I put my pins in starting from the raw edge and pull them out (when stitching) with my right hand. I LOVE your idea about pinning intersections!! I’m definitely going to incorporate than into my sewing! I always learn at least one new thing from each of your blogs…thanks!
I love the thread colors and the way the quilt is coming along.
What a great source of information!
When I am sewing in the bias and need to match seams I pin the intersections.
I do not use many pins…wonder clips here and there..
I use pins as needed. I do a lot of sewing without pins if I can nest my seams.
I almost never pin unless I am matching seams or am trying to “ease” in a less than perfect fit!
I am definitely a pinner. I pin while I watch TV, then go sew.
It doesn’t seem to matter whether I pin or not, I still have trouble getting my seams to line up…..but I am also getting used to a new machine as my old trusted friend of almost 40 years needed a break.
I know I am a bit more frustrated trying to figure out why things aren’t lining up on my new machine and I also know it’s me and not the machine.
I will try pinning more….it certainly can’t hurt, can it???
Even though I pin quite a bit sometimes my corners aren’t the best. Hopefully these tips will help!
Pins can certainly be a seam ripper’s enemy! When I pin, I spend less time ripping out the seam. I try to nest my seams and line them up that way to avoid so many pins, but there are times that pins are necessary!
duchick at gmail dot com
Aurifil thread is great. I learned the hard way, using thread that my machine did not like.
Love the fabrics in this quilt! And your instructional photos are perfect. Aurifil is the best thread for piecing.
I’ve learned (the hard way), that using pins at every seam intersection works the best for me! And, I also use Aurifil thread for piecing. Love the strength and the fact that it leaves very little lint in machine.
I’m not a pinner. If I’m sewing long strips I’ll use wonder clips to keep the seams together. Pins seem to end up in my fingers! Ouch!
I am a minimal pinner. The main time I use them is when sewing long borders or curves.
I love Aurifil thread for piecing and machine quilting.
I have always been a pinner. Enjoyed the new tips.
My machine loves Aurfil thread & so do I. Seams press flatter.
As much as I dislike taking the time to pin, if a strip is longer than 6 inches, I pin. Even with starch, I feel I have stretching going on and then my rows get wonky!
I do pin quite a bit although sometimes even that isn’t a guarantee 🙂 but when it comes to thread for piecing..Aurifil is the only thread for me. Un like fabric which you can lay out & pet, I sometimes just pull open my drawer of aurifil & admire the colors.
very little! but maybe I should do it mjore
I pin often, even though I sew with a Pfaff with IDT. I especially pin borders and rows. Thanks for your very thorough and informative blog post.
what GREAT tips!!!! i can see pinning more will ease some of my frustrations!!!! thank you!
I don’t pin as much as I used to, but it sure helps keep things lined up.
Just love Aurifil!
I am a pinner! Helps to keep the seams together, especially when matching points.
I am a big pinner. Sometimes I think I overdo it as it seems to slow down my sewing, because I stop to pull the pins out.
Thanks for all the good! Ian not normally a pinner, but maybe I will more often!
I am a pinner! Thank you for the great tips. I will incorporate them in my next project.
I’m a PINNER!! I pin everything in place. Sometimes I think I need to buy more pins just in case!
Since I got a sewing machine with even feed, I don’t pin as much as I used to. However, I do always pin intersecting seams.
Rather than just pinning, I sometimes nest my seams and take a few basting stitches. It is easy to take out if they don’t match perfectly.
Thanks so much for sharing your pinning secrets! I struggle with matching up the intersections of my rows, so I will be trying these techniques.
I must admit, I am quite the pinner. Not quite confident enough, yet, to do less pinning. It doesn’t bother me to do it. It’s all for the love of quilting. It’s worth it.
I am a pinner for sure, especially on curves! Great post!
I tend to pin a lot! It really helps to match those points and keep the blocks lined up. And I love Aurifil thread!
I am a lazy quilter so I avoid pinning if I can. I do pin however when it is warranted to keep seams matched!
I’m going to start pinning at an angle like you do. It makes perfect sense to me. Thank you. I use a zillion pins and am slightly paranoid and fearful about matching my seams.
Love the colors of the fabrics and the beautiful threads. I am just a beginner and I am finding y the joy in the pinning and slowing down. No rush to get finished!
I pin a lot, especially when I am joining blocks or rows together. It just seems to make things fit together better for me.
Great instructions!!! Love your blog!
I only pin occasionally. Mostly when I have long seams.
Over time have given in to the fact my piecing is much better when pinned especially as the project grows. Like reading others tips on pinning. Thank you.
Great tips. It’s not always as easy as it looks.
I used to just zip through without pinning and imagine I was doing a great job. Then there would be some reverse sewing. Now, when I’m doing rows or anything where there are multiple seams coming together, I pin. If it is a particularly difficult area, I may machine baste intersections and then ease in between as I go back and sew the whole row with a smaller stitch. Thank you for the wonderful tips.
I almost always pin intersections and I, too, find when sewing rows together that it’s easier to do them in groups of twos. Thank you for all the tips!
I sometimes use pins, but I tend to use my wonder clips more often as I was getting poked too much. Your pinning tip is a good one, and I will be giving that a try!
I pin, or if not then I may need to pick out. BUT, I always use Aurifil thread because I can always count on it, one less thing to worry about.
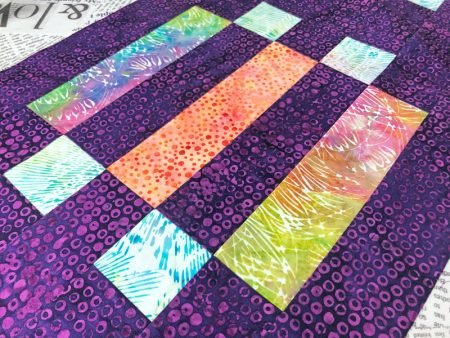
Lighthouse steps is a beautiful pattern. Like you I don’t pin a lot unless I am joining rows like these or blocks that I’m being careful to not lose my points
Pinning depends on what I am trying to sew together. If the instructions tell me to pin I will. Small pieces I do not.
Those are some great tips! I don’t normally pin much if it isn’t a long border – those I do pin to make sure fabric is evenly distributed. Thanks for the tips and thanks for the chance to win Aurifil thread. It’s the only one I use for piecing, and I do a lot of my longarm quilting with it, too.
I like to pin when I am sewing curves or a piece that has multiple intersecting seams.
Lighthouse steps is such a wonderful quilt for showcasing beautiful batiks. Thanks for sharing this and thanks for the tips! I’ve never been much of a pinner. But I see how it helps with accuracy.
My rows do not match up quite as beautifully as yours but maybe by row 37 I’ll get the hang of it ☺️
Love the post about pinning the rows..never to late to learn something new after years of sewing! This will be something I am going to do on my next project.
Love the thread colors!
I pin more when matching seams or for curves. I don’t pin when sewing strips or pieces without matching seams.