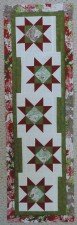
 Do you need a quick gift? Or maybe something to dress up your table? I have put together a quick star table runner- and I even added a few options if you are really pressed for time and need to make it even easier!
Ready? Set?
Let’s go!
To start here is what you need:
Fabric A– (for me that is red)- ¼ yard
Cut: (2) 2 ⅞” x 40″ strips- sub cut into (20) 2 ⅞” x 2 ⅞” squares
Fabric B- (for me, white)- ½ yard
Cut: (1) 5 ¼” x 40″ strips- sub cut into (5) 5 ¼” x 5 ¼” squares
(2) 2 ½” x 40″ strips- sub cut into (20) 2 ½” x 2 ½” squares
(1) 1 ½” x 40″ strip- sub cut into (5) 1 ½” x 8 ½” rectangles, (4) 1 ½” x 10 ½” sashing strips
Fabric C– (for me- a print)- ¼ yard or Fat Eighth
Cut: (1) 4 ½” x 40″ strip- sub cut into (5) 4 ½” x 4 ½” center squares
Fabric D– (for me, green)- ½ yard
Cut: (2) 2 ½” x 40″ strips- sub cut into (20) 2 ½” x 2 ½” squares
(5) 1 ½” x 4″ strips- sub cut into (5) 1 ½” x 8 ½” rectangles, (2) 1 ½” x 12 ½” inner top and bottom borders, pieces the rest of the strips as needed and cut into (2) 1 ½” x 44 ½” inner side borders.
Fabric E outer border- (for me, another print)- ¼ yard
Cut: (4) 2″ x 40″ strips- piece together as needed and sub cut into (2) 2″ x 46 ½” outer side borders and (2) 2″ x 15 ½” outer top and bottom borders.
Binding- ¼ yard
Cut: (4) 1 ½” x 40″ strips- piece together for single fold binding
Backing- ⅞ yard
Cut: (2) 20″ x 29″ pieces- sew together along short side and trim to a backing about 20″ x 56″.
To start, we are going to make the Center square.

1. Grab 1 Fabric C square and 4 Fabric D squares. Draw a diagonal line corner to corner on the wrong side of the 2 ½” x 2 ½” Fabric D squares. Position the squares in opposite corners of the 4 ½” x 4 ½” Fabric C center square.

2. Sew on the line; trim seam to ¼”. Press to the triangles. Repeat on the other two corners.

Center square should measure 4 ½” x 4 ½” square. Make 5 center squares.
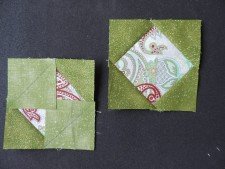
Even quicker version: To make the runner even quicker- skip adding the Fabric D squares to the corners of the center square. Just leave it the way it is!
Next up- the Flying Geese!
We are going to use the easy, no waste method. I have put together a handout on this method for future reference. Go here to get the PDF.
1. Layer the Geese fabric square with 2 Side triangle squares as shown.
Draw a diagonal line corner to corner across the Side triangle squares.
(Or, like I did, draw two lines each a ¼” away from the diagonal line.)
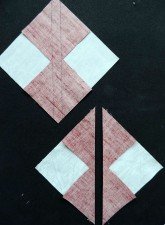
2. Sew ¼” away from the center diagonal line on both sides.
Cut along the center diagonal line. Press to small triangles. The units will look like little hearts. Cute!

3. Using one section, layer a Side triangle square as shown. Draw a diagonal line corner to corner on the square.
Sew ¼” away from the diagonal line on both sides. Cut along the diagonal line. Press to small triangles.
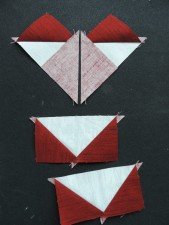
4. Repeat with the second section. You will have 4 Flying Geese units. Trim the little triangles- some call them dog ears, some call them tails… whatever! Trim them off. Geese should measure 2 ½” x 4 ½”.
Repeat to make a total of 20 Flying Geese units.
Not so bad so far, right? Almost done!
Onto making the Star block.
1. Lay out four Flying Geese units, four 2 ½” x 2 ½” Fabric B squares and one center square as shown.
Sew into rows, then sew the rows together. Star block should measure 8 ½” x 8 ½” square. Make 5 Star blocks.

Even quicker version: Don’t have time to make 5 Star blocks? Make only three and cut 2 pieces of a fun print fabric 8 ½” x 8 ½” square and substitute for the other Star blocks! For really quick version- make only one Star block, cut 4 pieces of fun fabric and put the Star block in the center of the runner!
2. Sew the 1 ½” x 8 ½” Fabric B and D rectangle together along the long edge. Sew to the side of the Star Block.

Note: We sewed the rectangle units to the right edge of three blocks and to the left edge of two blocks. We like the slightly wonky effect of the blocks offset from each other. You can do it anyway you like! Or even skip this step and just adjust the border size. I like it because it keeps it from looking like any other star block runner! A little different. A little wonky.
3. Lay out the five Star Blocks, with the 1 ½” x 10 ½” Fabric B sashing strips in between the rows. Sew the rows together.
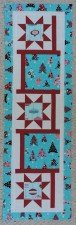
It is easier to see the sashing in this version- I changed them up and made them red to stand out!

Now to add some borders!
1. Sew the 1 ½” x 44 ½” Fabric D borders to each side of the runner. Press to borders.
2. Sew the 1 ½” x 12 ½” Fabric D borders to the top and bottom of the quilt.
3. Sew the 2” Fabric E borders to the Runner in the same manner. The table runner should measure 15 ½” x 49 ½”.
4. Quilt as desired and bind with single fold binding. Done!!!
I quilted mine in straight lines about 2″ apart. It only took me a few minutes.
If I had taken a few minutes more, all the lines might have been straight!

Still, it looks OK to me!

I even made a second one to match my funky holiday quilt. I just have to quilt this one.
Need information on how to do single fold binding? Click here for a free PDF.

Want the runner instructions in a PDF? Click here!
I hope you have fun making our Easy Star Table Runner. I know I had fun!
Happy Holidays!
Kate